An avid fan of the stealth-shooter genre, Jake is Respawnfirst's co-founder and Lead News Editor with over 5-years of experience. He prefers tactical-based shooters over mainstream titles and regards PS4 and PC as his choice of gaming platforms.
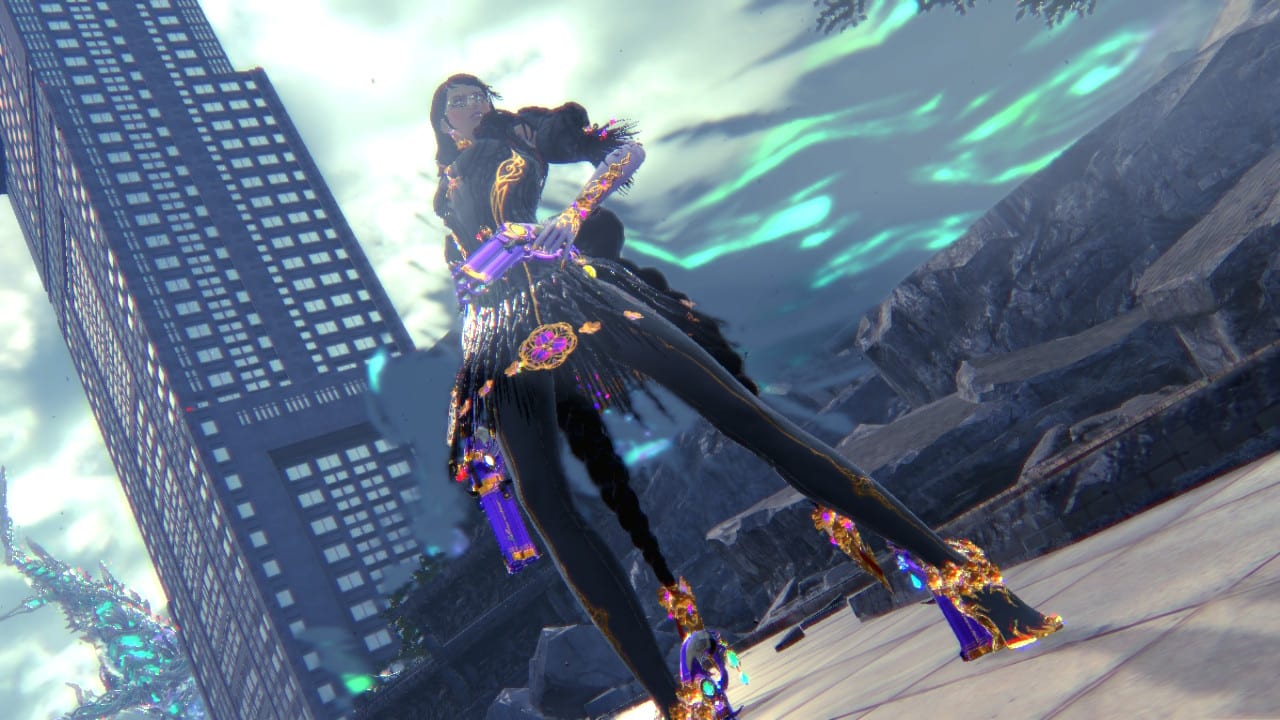
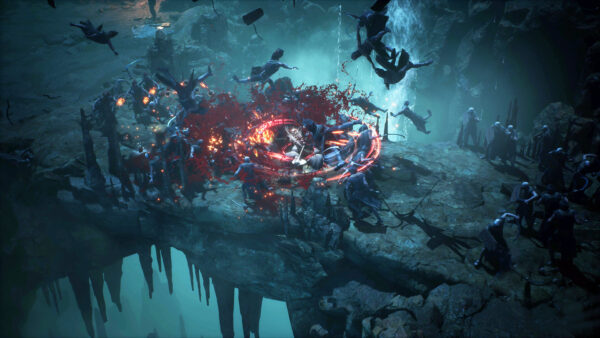
After seeds, the next primary currency in Bayonetta 3 is orbs. This currency is far more critical to farming than seeds because this one is used to make upgrades to your weapons, skills, and Demon Slave abilities. In this guide, let’s discuss everything you need to know on how to farm orbs in Bayonetta 3.
There are two ways to farm orbs but let’s start with the basic one, replaying chapters.
Replay Chapters: As I also suggested in the seeds farming guide, the best way to farm currencies in Bayonetta 3 is to replay chapters. Especially the chapters that pit you against waves of enemies. Avoid doing chapters that involve puzzles.
Mallet of Rewards: This is an accessory you can unlock with seeds to increase the number of orbs you get from combo points. Mattel of Rewards is available for purchase at Rodin’s shop.
Combo Points: Accumulating more combo points in battles is a great way to earn extra orbs. Chain together moves to create combos and avoid taking damage in battles.
Orbs are shown at the top right section of the screen via what looks like a pink skull icon. When you have enough orbs to make an upgrade, go to the main menu, where you can use orbs to enhance your weapons and gear.
Seeds are a currency used in the game to purchase consumables and cosmetic items. Halos are no longer the primary currency, so farming seeds has become much more important. Bayonetta 3 players must farm seeds because they play a role in overall progression. In this guide, let’s discuss the best seed farming tips for Bayonetta 3.
There are multiple ways to earn seeds but let’s start with the most basic one, enemy drops.
Kill Enemies to Earn Seeds: Homunculi enemies drop seeds every now and then, so killing them on sight is the best way to farm seeds. Simply playing the story mode and killing Homunculi is a great way to get seeds to purchase items.
Some Chapters Are Great for Farming: Some of the game’s chapters pit the player against swarms of Homunculi. These chapters are a great way to farm seeds, so make sure to replay such chapters. For example, the first chapter of the game is great for seed farming as it features a good chunk of open-world sections where you can find seeds by simply roaming in the area and killing enemies.
Get High Combat Ratings: At the end of each chapter, you get a combat rating based on how well you did. Aim for high combat scores through faster mission completion, taking no damage during the battle, and combo efficiency.
That’s everything you need to know, but visit our Bayonetta 3 guides hub for more content before you go.
It is finally time to hit Modern Warfare 2 multiplayer and test our skills against some of the world’s best (or worst). There are many things to try out, from various killstreaks to a slew of lethal equipment, but what is the meta? That question is key to your success in Call of Duty Modern Warfare 2 multiplayer. Knowing the meta to create the best loadout can make all the difference.
Despite all of the new features and weapons we have seen, the M4 is a tried-and-true weapon that has proven to be nothing short of lethal in Call of Duty MW2. The M4 is a series classic, and the gun is already dominating engagements in the multiplayer mode. In this guide, let’s create the best Modern Warfare 2 M4 build to take over the maps.
Best M4 Attachments
First, let’s discuss the attachments you need to create this build. The attachments you need are the ones that improve recoil, which brings us to Tempus Hightower 20″ Barrel. With this barrel, you not only get recoil control but also increase hip fire accuracy, damage range, and bullet velocity.
Next is the 4MW Laser Box to boost hip-fire accuracy and improve recoil. This attachment also helps you stay nimble and respond to enemies faster. Your M4 will become extremely effective at close range, compensating for the barrel’s loss of hip recoil control and hip firing precision.
Go with the basic red dot sight on the M4; we don’t need anything fancy on it for the multiplayer mode. Let’s save the fancy stuff for Warzone 2.0.
Optic: Cronen Mini Red Dot
Stock: Demo Fade Pro Stock
Rear Grip: XTEN Grip
Muzzle: Forge-Tac Castle Comp
Barrel: Tempus Hightower 20″ Barrel
Best M4 Perks
Lastly, you would need to equip yourself with the best perks with this M4 build.
Perk 1: Tracker
Perk 2: Scavenger
Bonus Perk: Fast Hands
Ultimate Perk: Ghost
Secondary: Expedite 12
Tactical: Snapshot Grenade
Lethal: Proximity Mine
Field Upgrade: Munitions Box
That’s everything we have but if you want to add something to the guide, or suggest an even better build, let us know in the comments below. And if you need more help, here are some more Modern Warfare 2 guides you may find helpful:
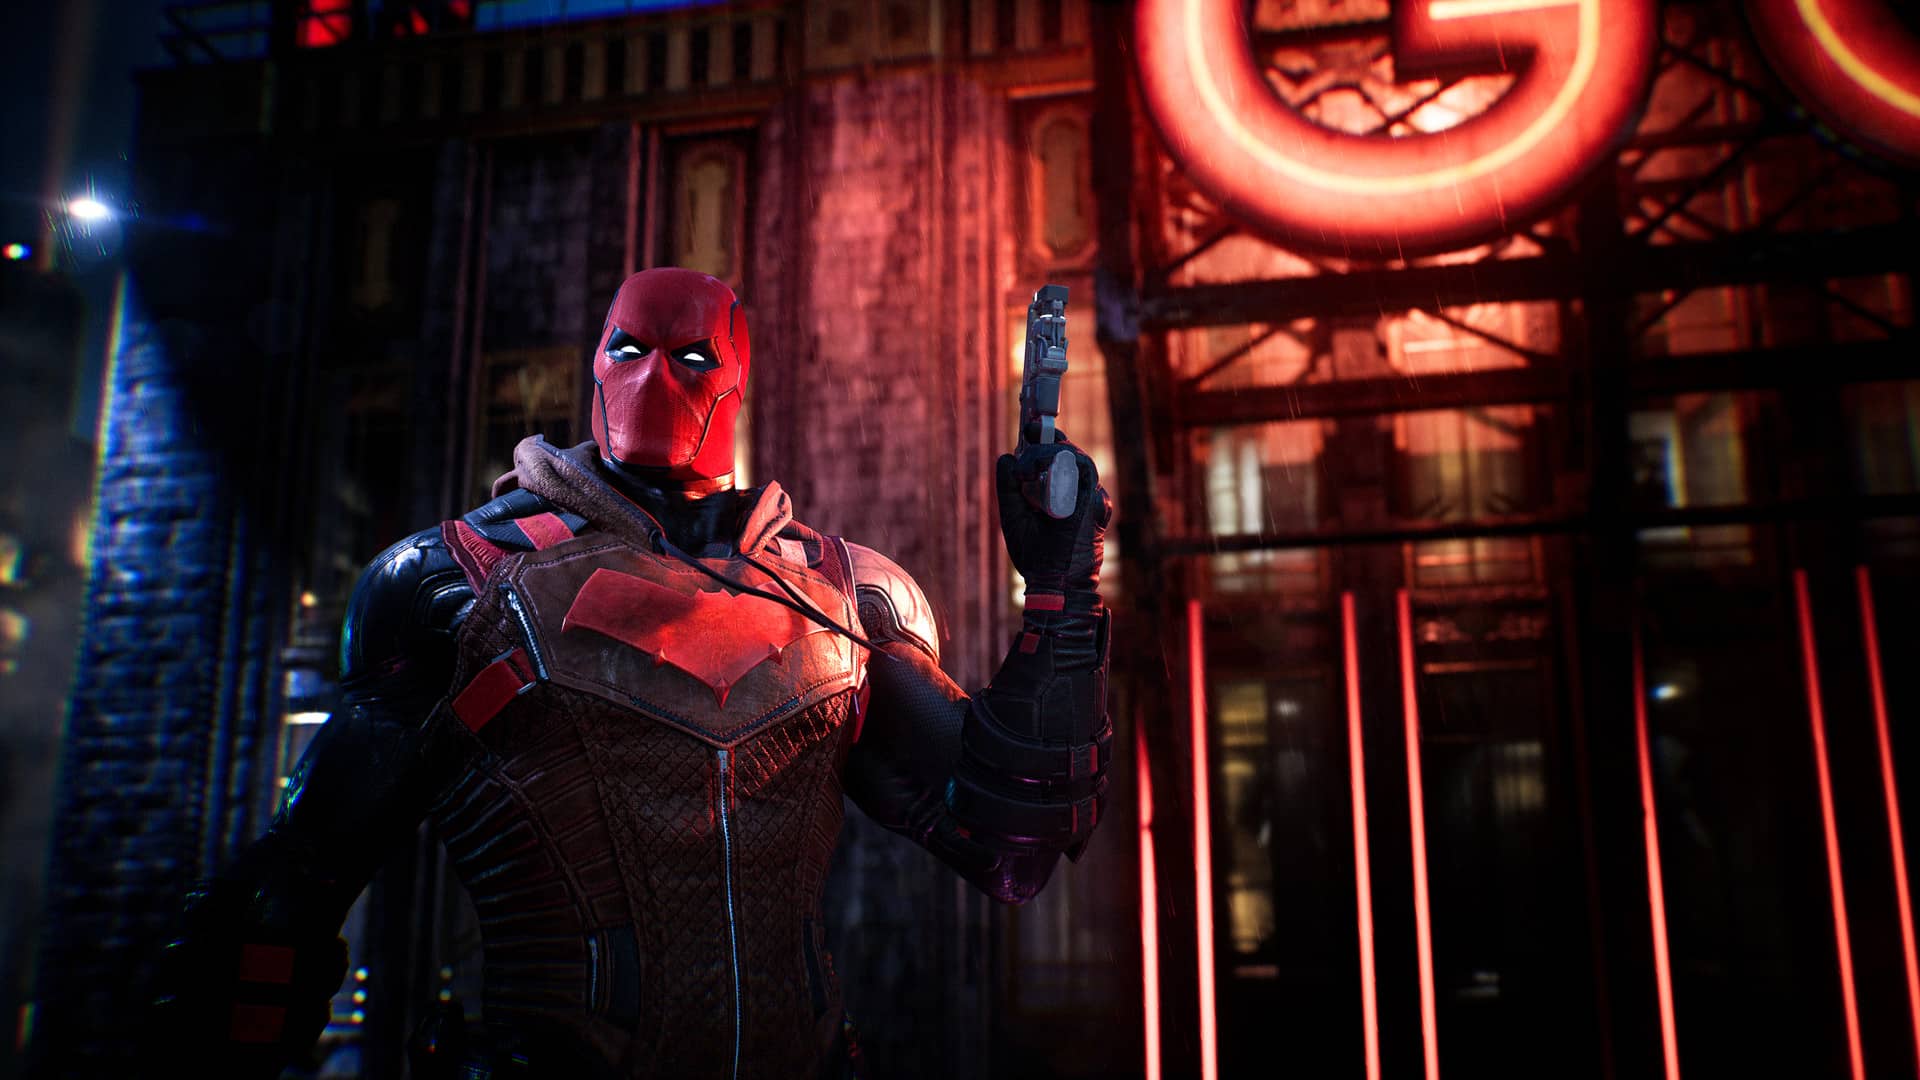
Landmarks are a type of collectible in Gotham Knight. The game has many landmarks, each placed outside the Heritage Sites in Gotham City. Landmarks are spread across the game, so you’ll need to traverse the map quite a bit before collecting them. When you reach a landmark, you must examine the plague on-site to collect your XP.
Landmark Locations
Location #1 – Giverny Plant
The first location on our list, is Giverny Plant, west of Dixon Docks, northeast of Waynetech.
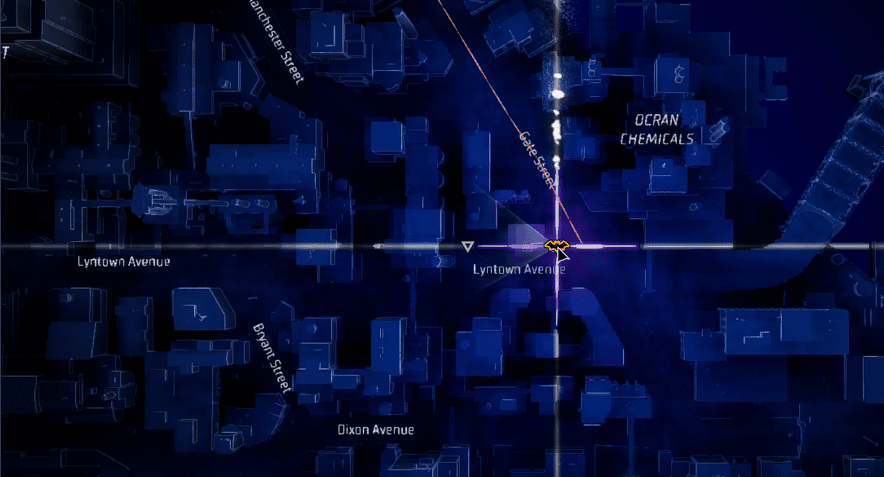
Location #2 – Southside Glassworks
Southside Glassworks is another Gotham business located to the Southwest of Ocran Chemicals, north of Wayetech.
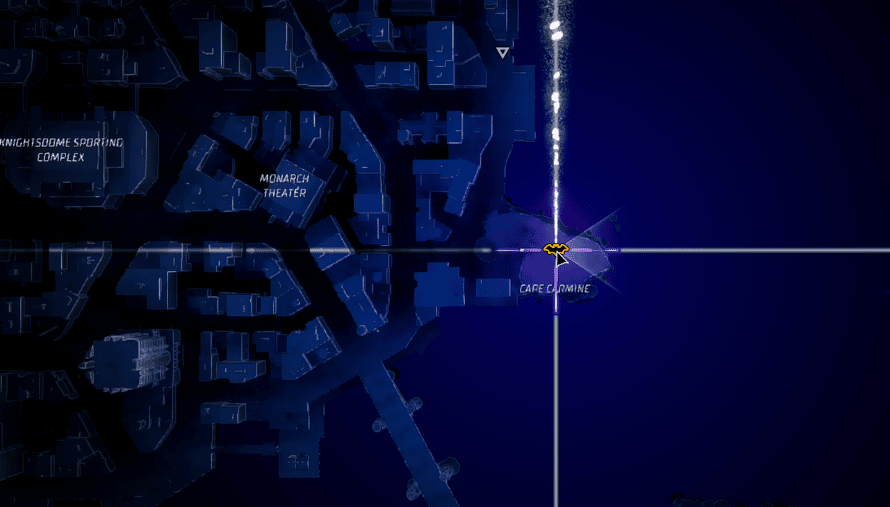
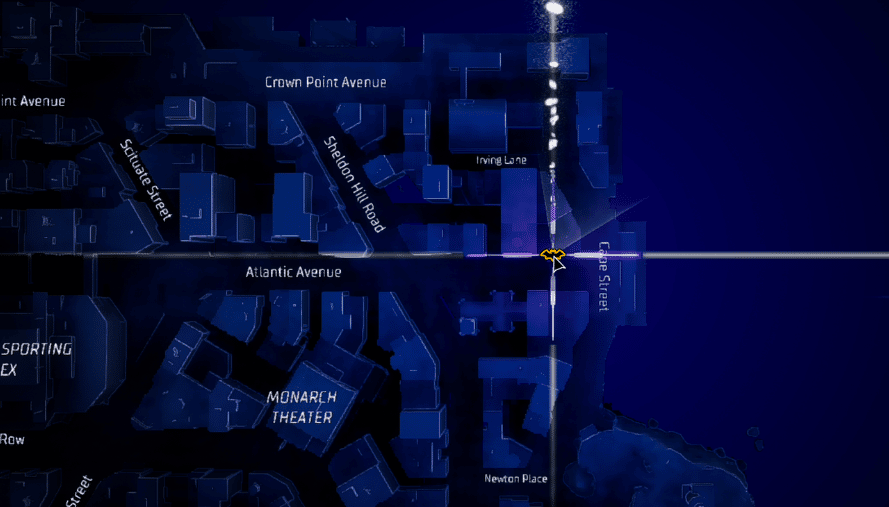
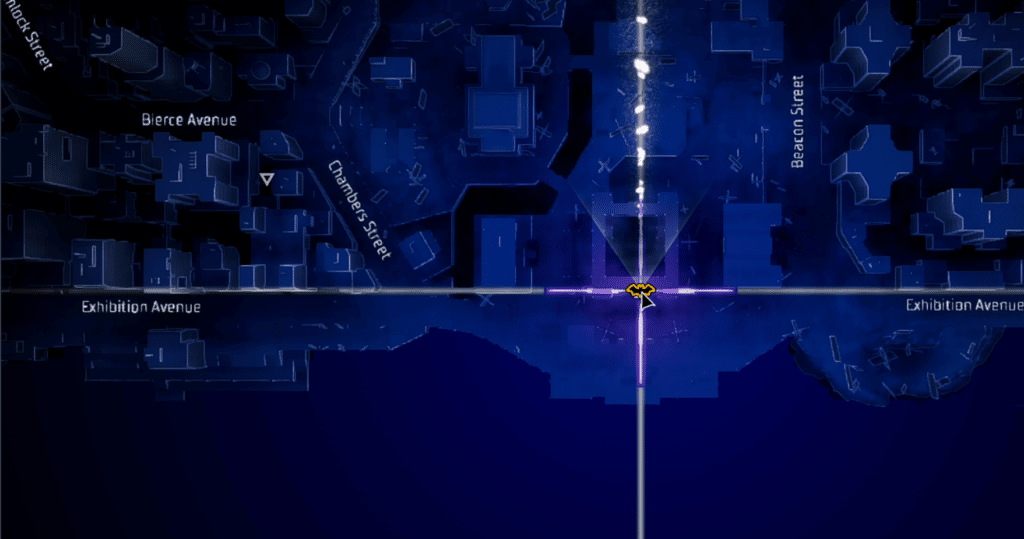
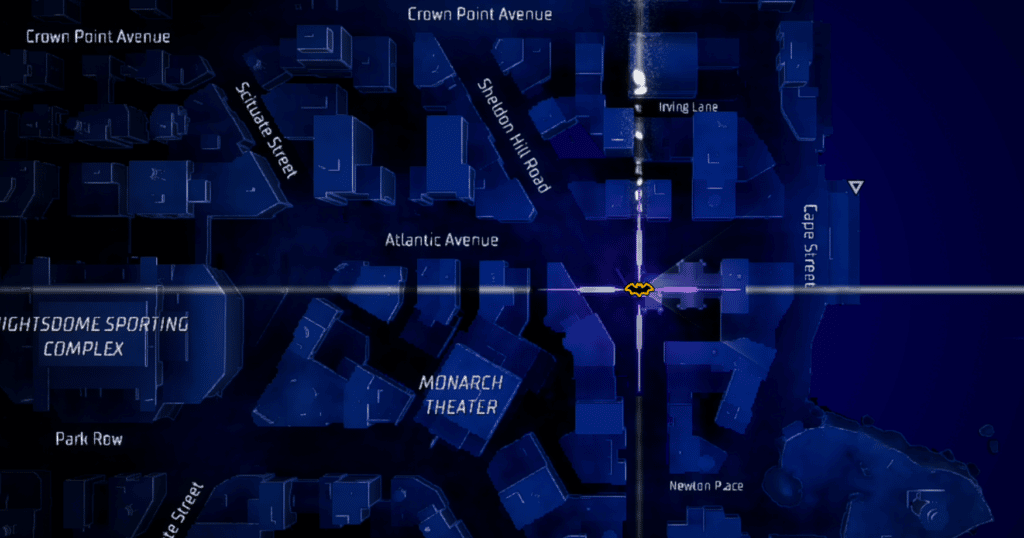
Location #3 – Cape Carmine Lighthouse
The Cape Carmine Lighthouse is to the west of Knightdome Sporting Complex and Monarch Theater in Cape Carmine.
Location 4 – S.K. Animal Shelter
S.K. Animal Shelter is located east of Atlantic Avenue in the Bowery, southeast of Cape Carmine.
Location #5 – St. Faustina Church
The church is in Bristol, southwest of Gotham City Cemetery. It is at the intersection of Oxylus Street and Reservoir Avenue.
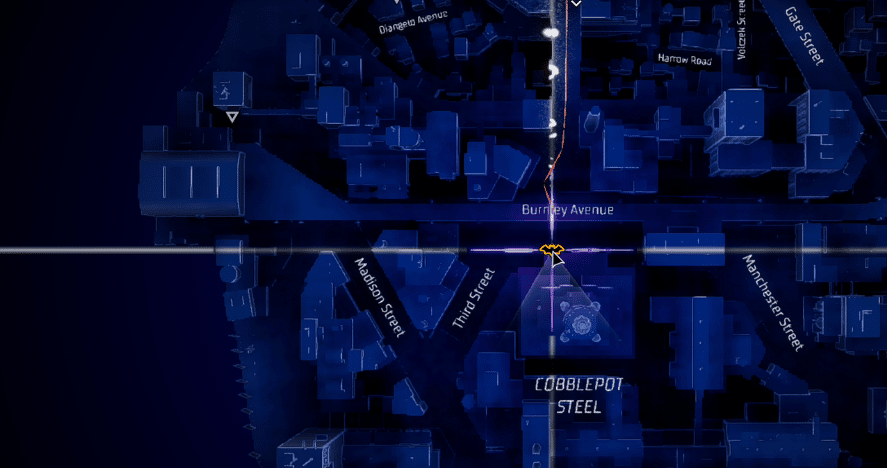
Location #6 – Cobblespot Steel
Cobblepot Steel is marked on the map, so it’s really easy to find. You can visit the location between Manchester and Third Street.
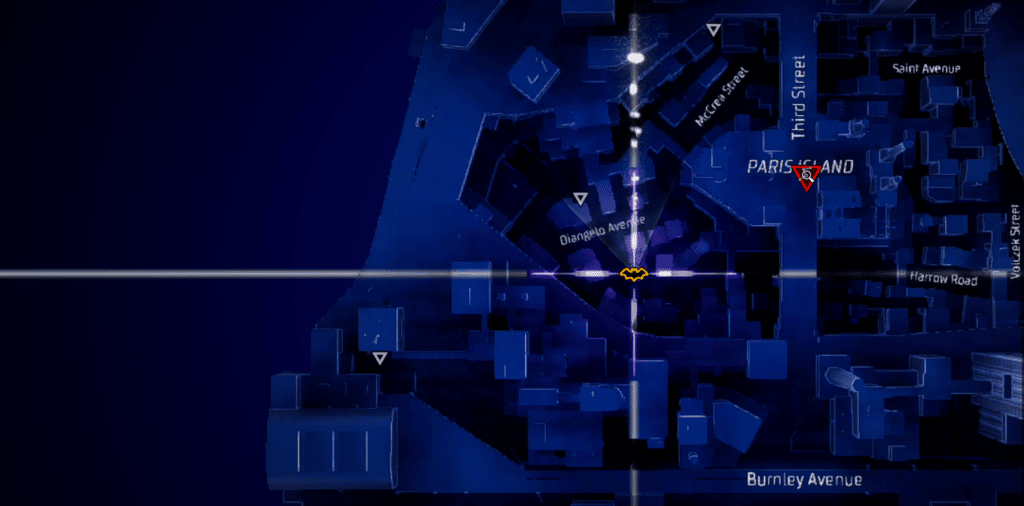
Location #7 – Luigi’s Finest Pizza
Go to the western edge of The Cauldron, northwest of Paris Island.
Location #8 – Paris Island Incinerator
The factory is located on Third Street, Paris Island, in The Cauldron.
Location #9 – Robinson Park Exhibition Grounds
A statue in Robinson Park is easy to find on the northwest side.
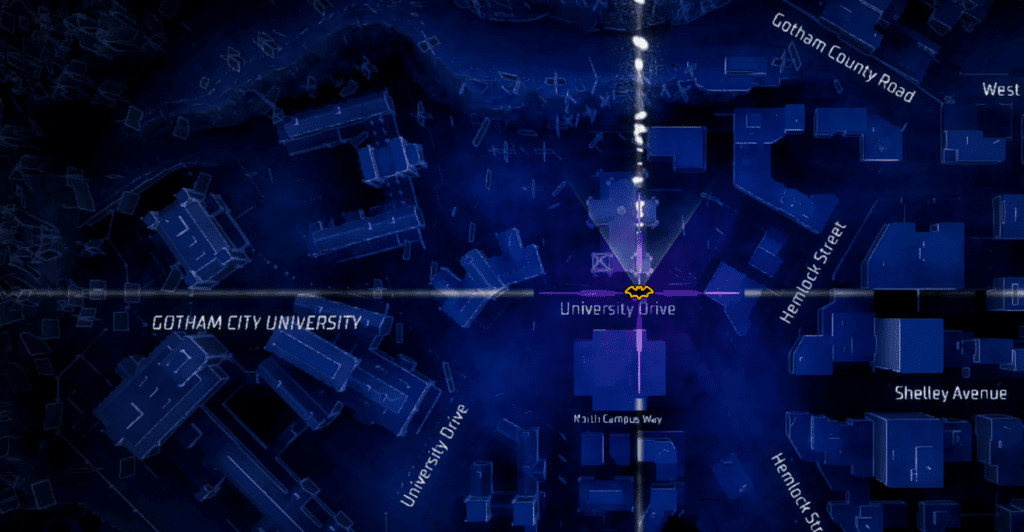
Location #10 – St. Joseph Church
The church is on University Drive in Gotham Heights.
Location #11 – St. Swithuns Church
The church is located in Old Gotham, southwest of Gotham City Hall.
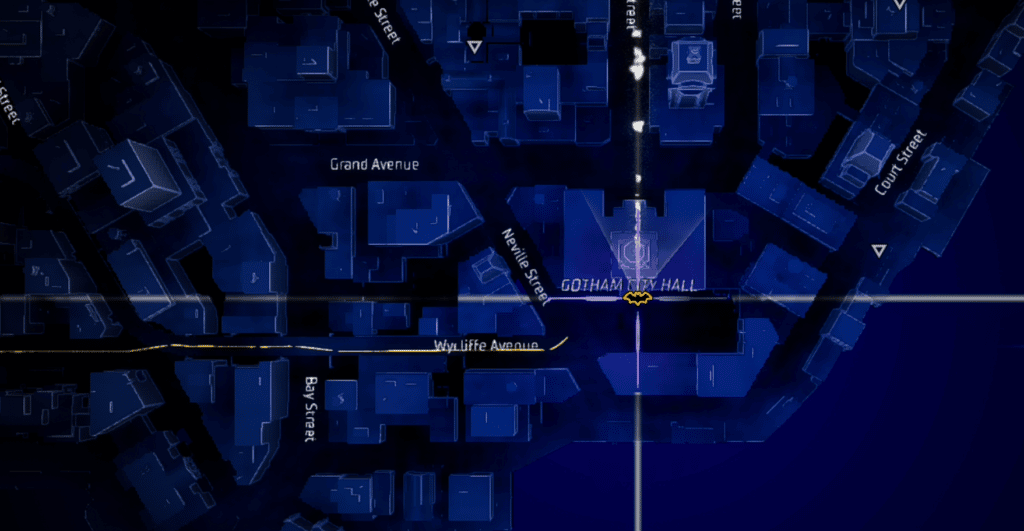
Location #12 – Gotham City Hall
Gotham City Hall is in Old Gotham, and it’s marked on the map.
Location #13 – Gotham City Fire Department
Gotham City Fire Department is on the west side of Longerquist Avenue in Old Gotham, east of Gotham City Cathedral.
Location #14 – Gotham City National Bank
The location is a bank in the middle of Commerce Avenue.
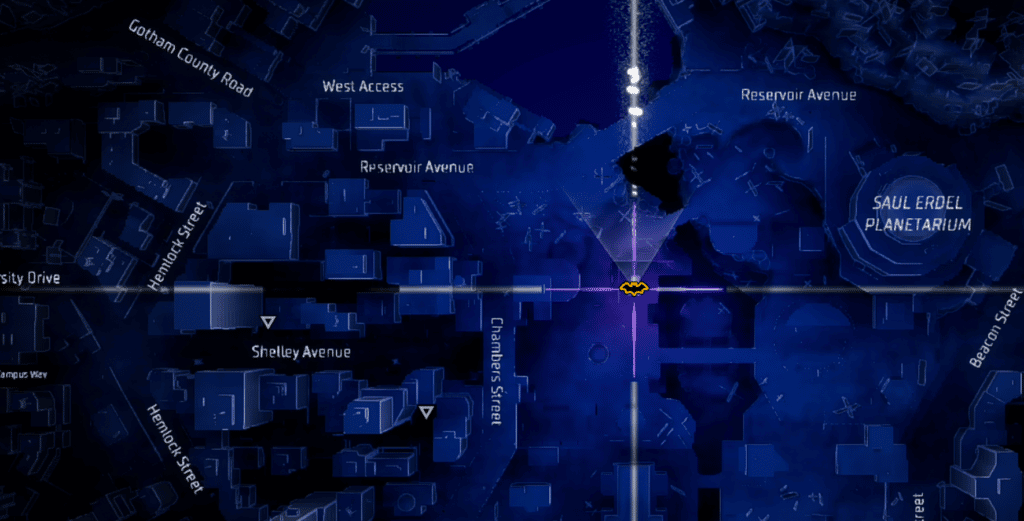
Location #15 – Robinson Park Plaza
Robinson Park Plaza is on the south side of Robinson Park, southwest of the Saul Erdel Planetarium.
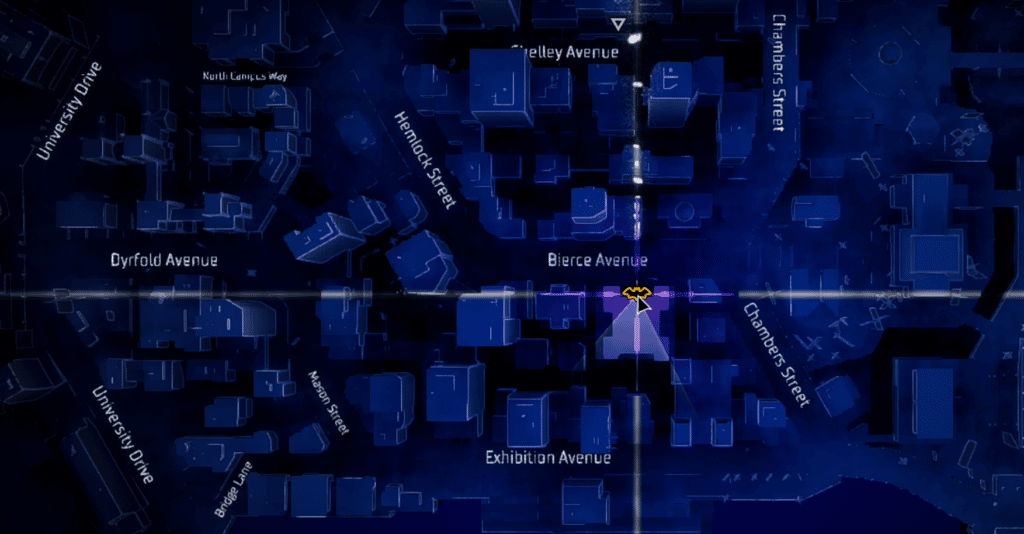
Location #16 – Gotham Heights Residences
Go to Gotham Heights and locate the big residential building on Bierce Avenue.
Location #17 – Ralli’s Family Restaurant
The restaurant is in Otisburg, on Berger Avenue.
Location #18 – Sacred Martyr Church
The church is in the Bowery, northeast of Monarch Theater and northwest of Cape Carmine.
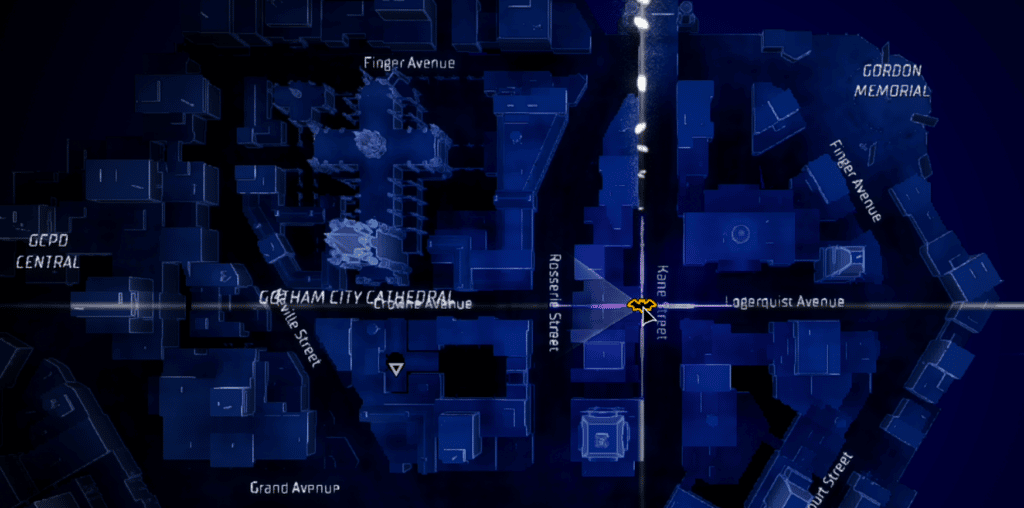
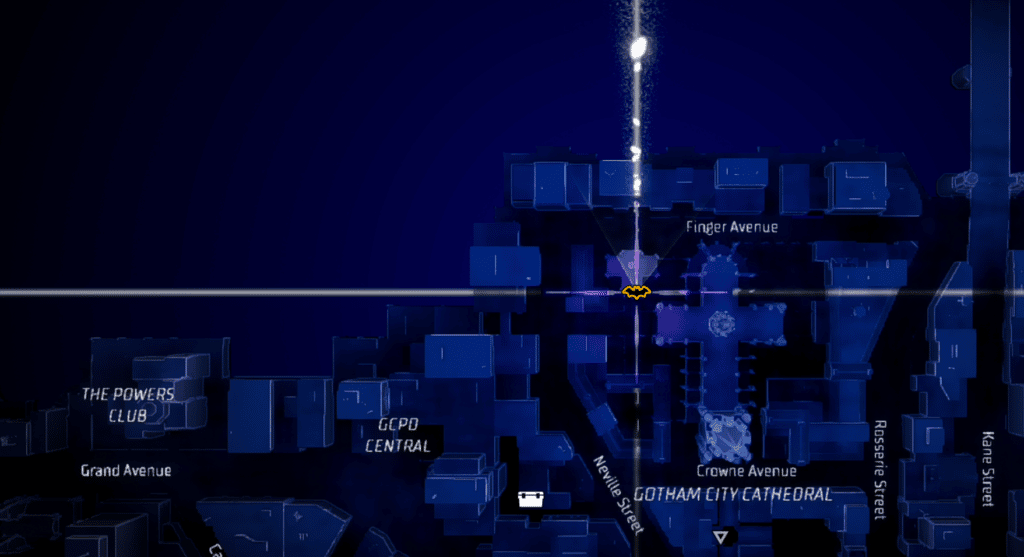
Location #19 – Gotham City Cathedral
The church is between Finger Avenue and Crowne Avenue.
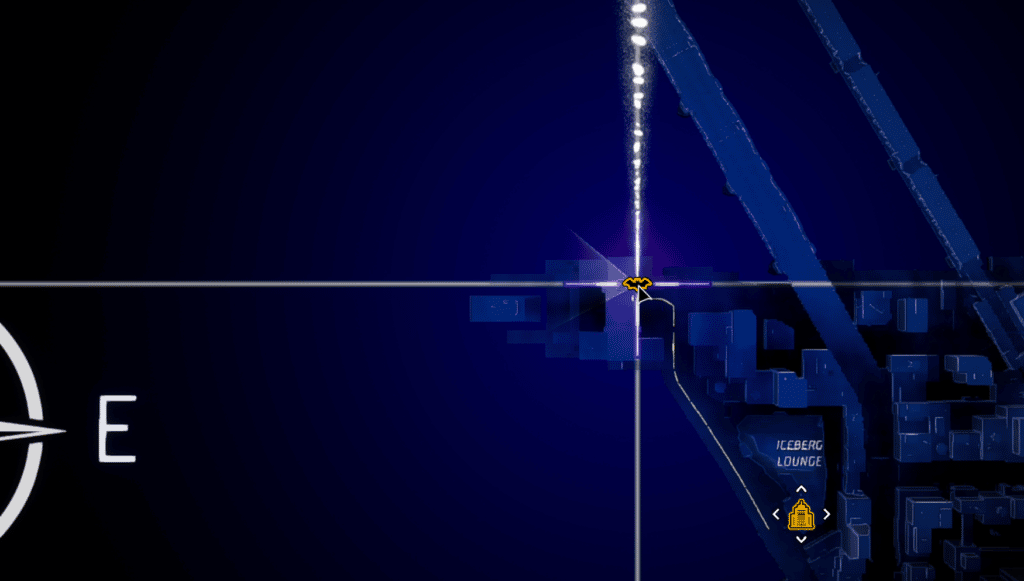
Location #20 – Sundollar Coffee
The coffee shop is on the northwest edge of the Financial District, northwest of Iceberg Lounge.
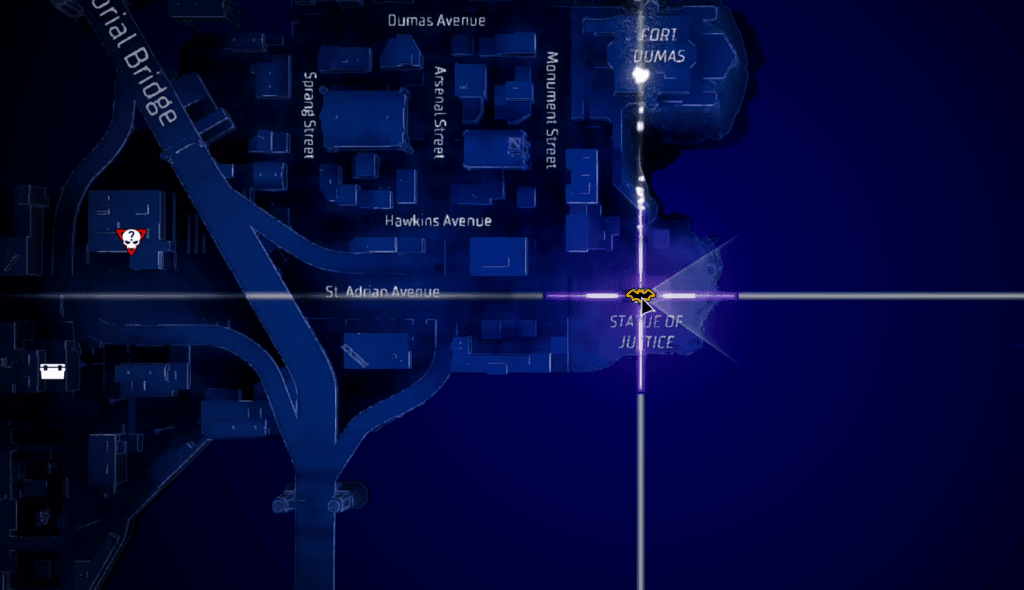
Location #21 – Statue of Justice
You are looking for a statue on Tricorner Island, the statue of Justice.
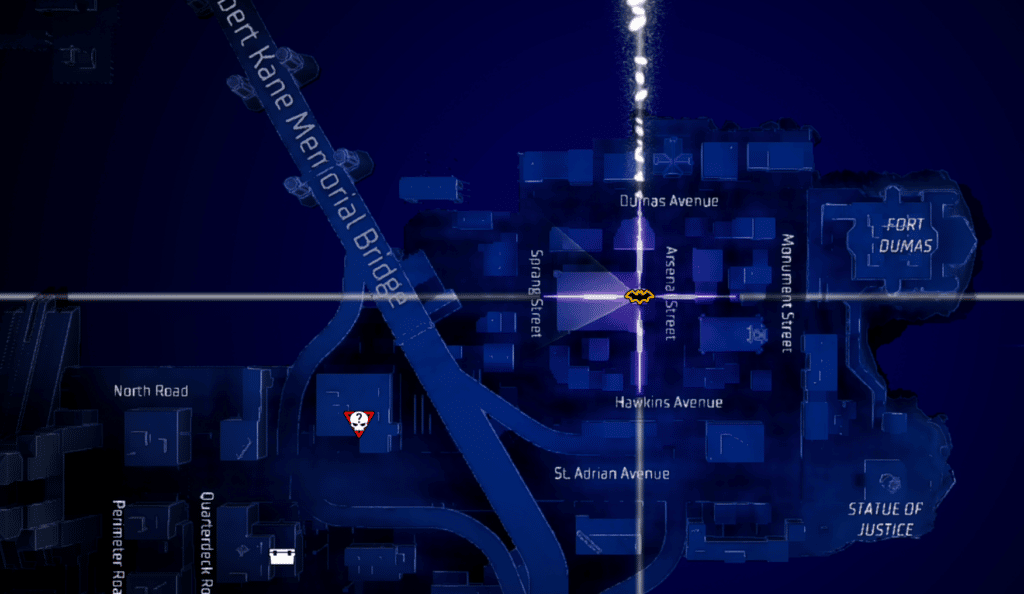
Location #22 – Armory
A small fort on Tricorner Island on Arsenal Street.
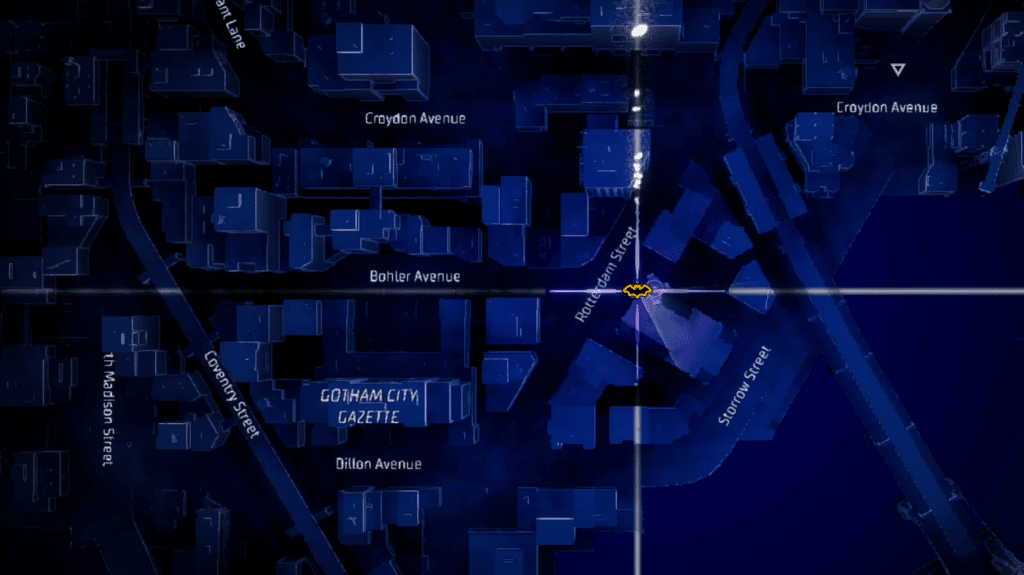
Location #23 – First Church of Gotham City
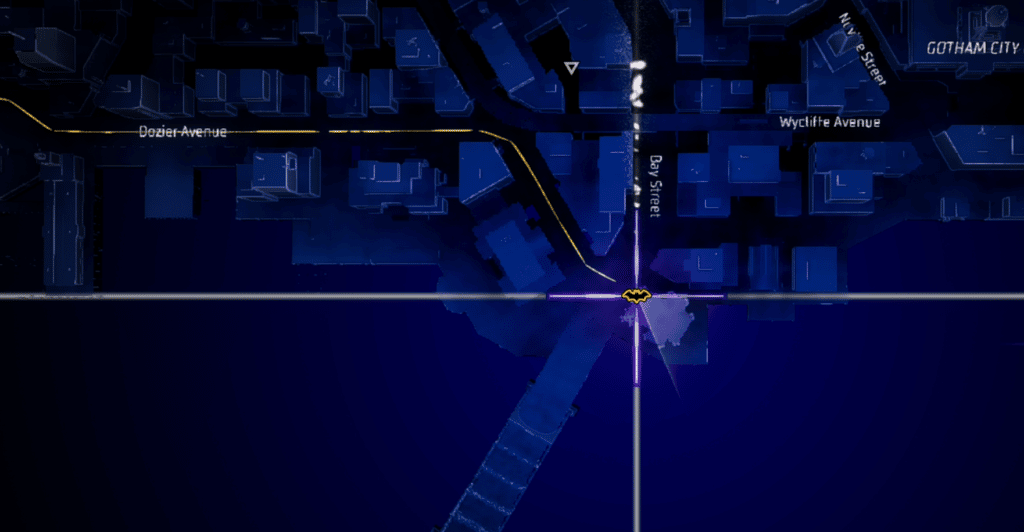
The church is on the western end of the map, near the bridge on Rotterdam Street.
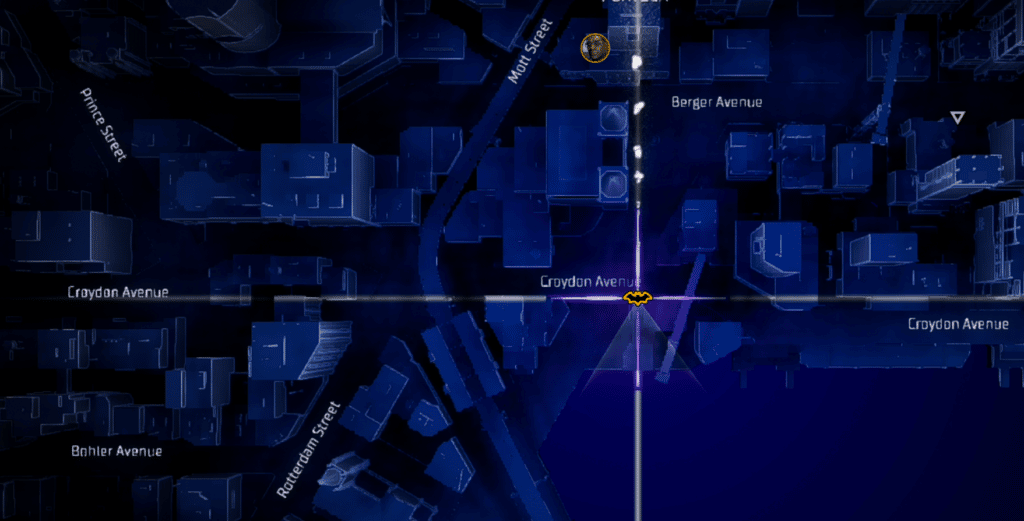
Location #24 – Split Pea Catering
Split Pea Catering is in Otisburg on Croydon Avenue.
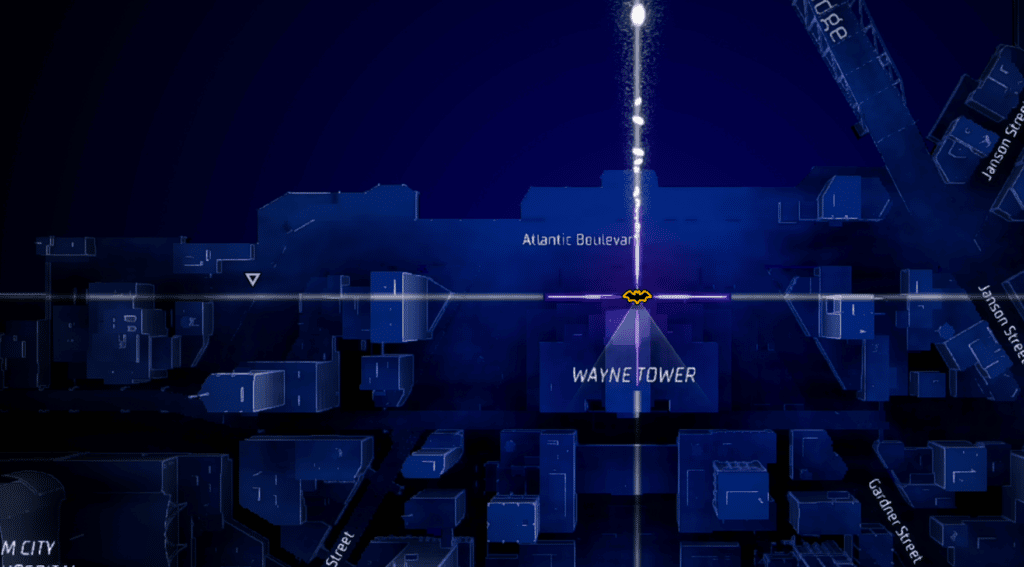
Location #25 – Wayne Enterprise
Wayne Enterprises is located on Atlantic Boulevard.
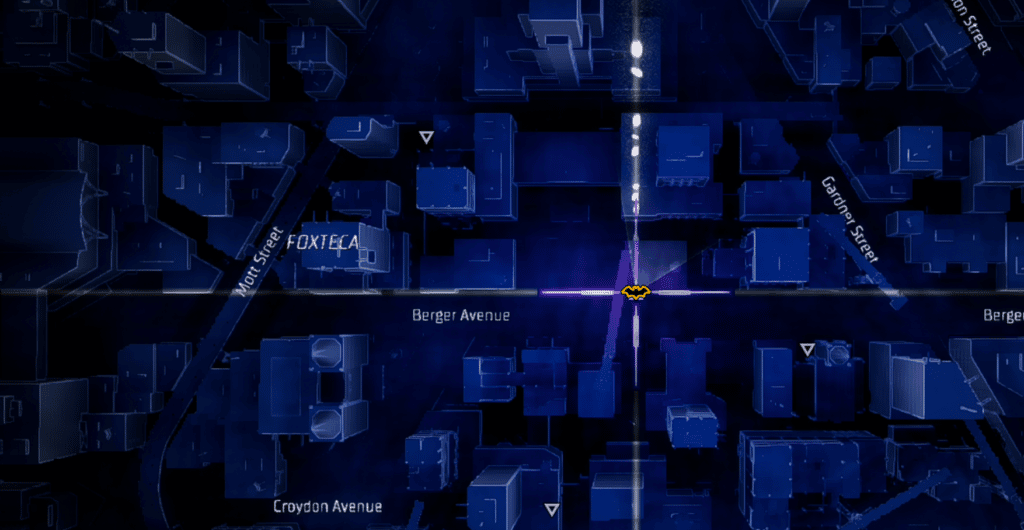
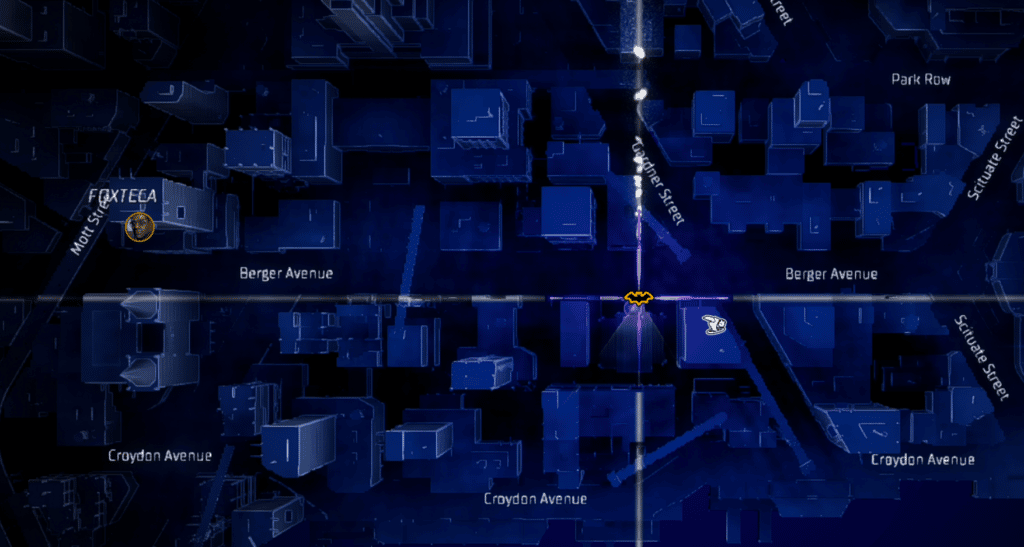
Location #26 – St. Aloysius Church
The church is at the intersection of Berger Avenue and Gardner Street.
That’s everything you need to know to find all Gotham Knights Landmark Locations. If you need more help, here are some more Gotham Knights guides you may find helpful:
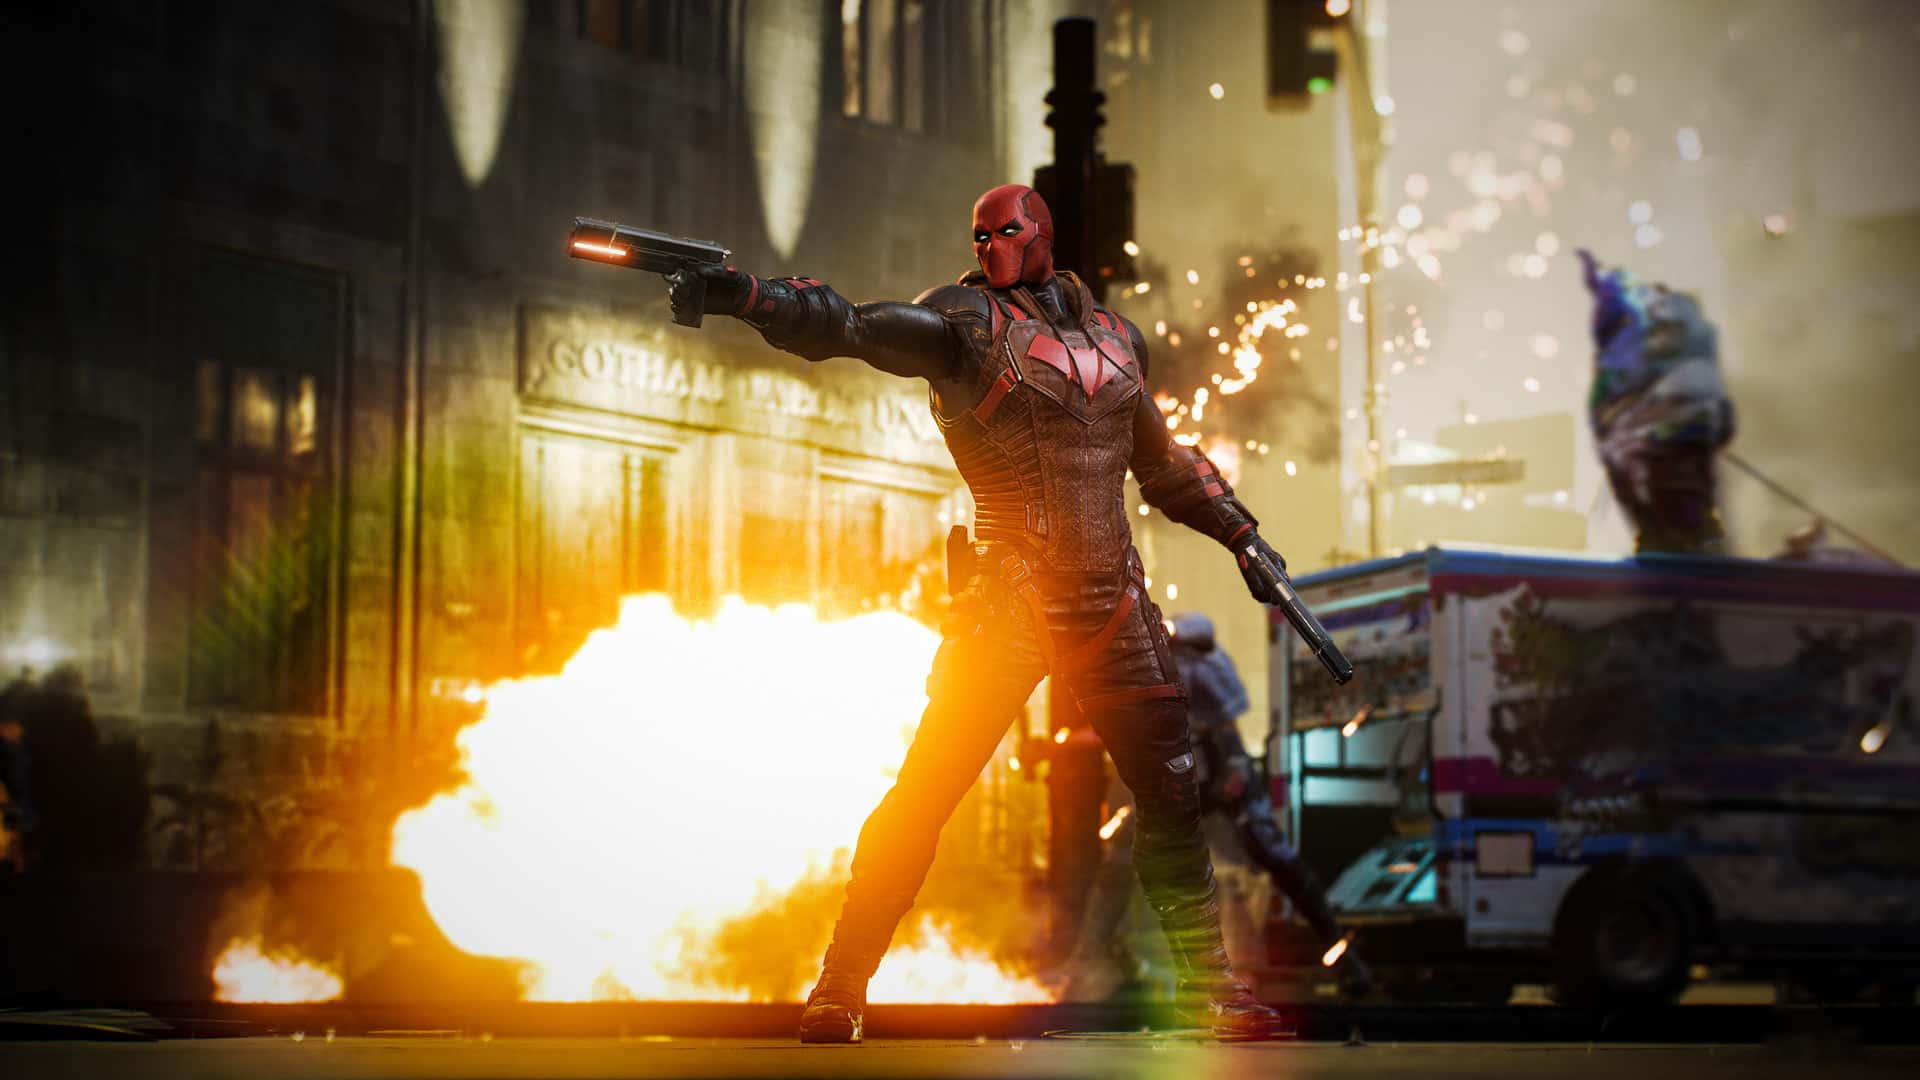
Gotham City heroics are now led by the Gotham Knights, a new group formed by Batgirl, Red Hood, Nightwing, and Robin. Batman is dead, so all responsibilities fall on the Gotham Knights, including investigation. A key part of any investigation is interrogation. This guide will discuss everything you need to know on how to interrogate enemies in Gotham Knights.
To interrogate an enemy in Gotham Knights, you need to capture them using stealth or beat them up to the point where their health drops below 50%. Not all enemies can be captured for interrogation; only enemies with a question mark “?” on their heads can be captured for interrogation.
Stealth Method: Approach an informant enemy from behind and press R2/RT to interrogate.
Beat ’em Up: If the stealth method fails or is not an option in your current situation, beat up the enemy until their health drops below 50%. Then press Y or Triangle on the controller to start the interrogation.
You will then get clues for Premeditated Crimes and on your next petrol, you can stop those crimes from taking place. All heroes in Gotham Knights can interrogate enemies and go on patrols.
That’s everything you need to know on how to interrogate. For more, visit our Gotham Knights guides hub.
After you solve the crane slider puzzle, get access to the egg creature. From there, the mine cart puzzle will begin, which can be solved in two ways; you can save the egg creature or kill him. No matter what you choose, you’ll progress further in the game.
Solution #1 – Save the Egg Creature
After solving the first puzzle, go back to the elevator and reach the main large circular room. Follow the tracks on the floor to find a chair on which you need to place the creature.
You need to move the chair to the left along the rails and stop it under the device near the podium. Use the controls to place the creature on the chair but before you move, go to the top of the central pillar. You’ll be switched to a bird’s eye view when you use the controls on the pillar.
Here’s the correct order of the switches to save the creature:
Hit bottom right switch to continue circling the room
The bottom right switch should be changed to the up position
The top right switch should be flipped to the rightmost setting
Go back to the chair and start moving it along the rails. You will eventually reach the room where the creature’s shell will be removed. Use the panel in that room to operate the crane that removes the creature’s shell.
Note: Using the chair with the scoop in the other room will kill the creature.
Help the creature across the corridor and get the hand key. Take him to the podium to open the door and end this section of the game.
Scorn’s Act 1 puts you in a challenging position early on with the Crane Slider puzzle. To solve this puzzle, you need to use the crane mechanism and place the pods correctly, and in this guide, we will discuss everything you need to know on how to solve the Crane Slider puzzle.
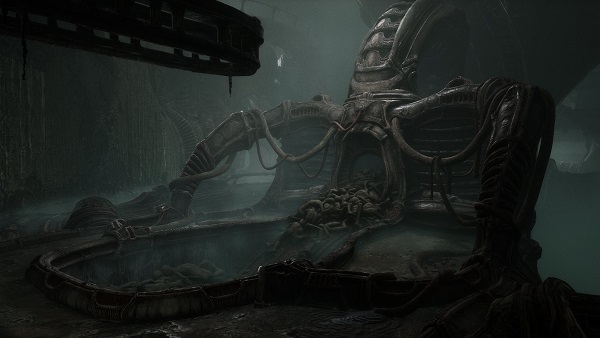
You can see weird machines during the crane slide puzzle section, and your main goal is to use all of them correctly to solve the puzzle. When you enter the room with a giant stone structure in the middle, go to the large room on the east side. You can’t open the door for the time being, but there is an archway to the right of the large door.
Head through the archway, and there should be a room and an elevator opposite the room. We are not going in the room, so head to the elevator.
Use the elevator to reach the upper level, where you should see an extended platform near a big wall. Out of the two control panels, use the one on the right.
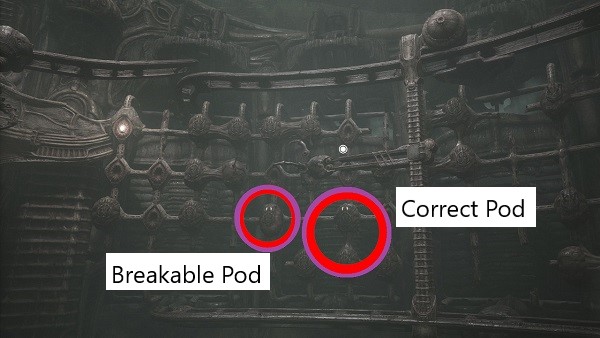
The Crane
You will get control of the crane that moves the pods on the wall. You need to move the correct pod to the top left corner of the wall. The correct pod must be moved through empty pod slots all the way to the grab slot. The panel on the right controls the pods, but the panel on the left can help you break the pods. Not all pods are breakable, so some need to be moved out of the way via the right panel to clear a path for the correct pod.
The breakable pod is linked to a pod below it, so you need two horizontal slots to move the correct pod. To solve this puzzle, you must move all empty pods to the right while moving the correct pod to the left.
You can check out the video from Lunar Gaming Guides to help you solve the first mine cart puzzle in Scorn.
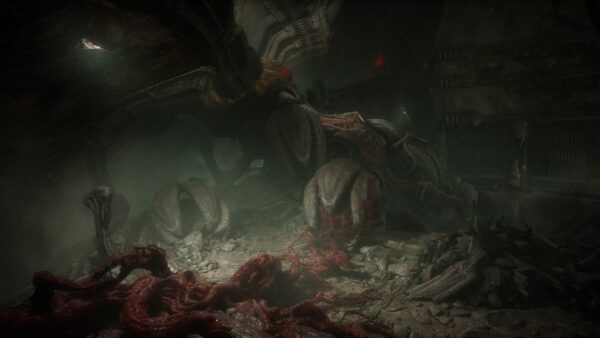
Once the pod is in position, leave the mechanism and go to the newly revealed humanoid creature on the lower floor. In the middle of the room, there should be a cart, and come controls to access it should be placed behind it. From here on, the Scorn crane puzzle starts.
Charms are among the most essential items you need for a powerful build-in Undecember. Charms help you increase overall damage. Charms are applied to your character for further buffs to combat capabilities. A good amount of your damage comes from charms, making them a crucial part of your build.
To unlock charms in Undecember, you need to complete Act 10. Moreover, after Act 11, you get access to a legendary charm. Once you unlock the charms, you can access them through the charm menu button on the bottom right corner. Charms unlock over time as you progress through the story, complete raids, and other activities.
You get a total of six charm slots, and each can hold one charm for your character. Each charm slot has a different ability; you unlock these slots as you go deeper into the game.
You can farm charms through raids and bosses. As you run different maps, charms of various effects will drop. The most you play, the better your chances are of getting the best charms in Undecember.
Lastly, you can click on the charm in your inventory to get all the info you need about its buffs and effects. If your goal is to increase damage, look for charms that increase Projectile Damage or Physical Damage.
That’s everything you need to know about unlocking charms in Undecember. If we missed any detail, let us know in the comments below.
If you push the Illusion Ritual Spell to level 100, you can speak with Drevis Neloren at the College of Winterhold to get the master magic quest. Inquire about anything new from Drevis to start the quest.
Drevis will offer you the special illusion spell called Vision of the Tenth Eye. The spell allows you to see invisible items/texts for 30 seconds. The spell in question is key to finding the master illusion spell clues hidden in the College of Winterhold.
What you are looking for books containing Master Illusion Texts. Here are all the books locations:
The first book is sitting on the table inside The Arcanaeum.
The second book is on the second floor of the Hall of Attainment. Look under the bench close to the stairs.
The third book can be found in The Midden, under the basement of The Hall of Countenance. Check near an Atronach Forge on a table.
The final book is on the second floor of The Hall of Countenance. Check on the top of a barrel inside the room near the stairs.
Return the texts to Drevis Neloren in exchange for Spell Tome: Hysteria. This ends the quest, and you can move on to other activities.
Need more help? Here are some Skyrim Guides you may find helpful:
When your destruction skill reaches level 100, go to the College of Winterhold and speak with Faralda, who will offer you the Destruction Ritual Master Magic quest. Completing said quest gets you the Fire Storm Tome and access to Blizzard and Lightning Storm from Faralda.
Getting the destruction skill level to 100 opens up a new dialogue option at Faralda. She offers you a book named Power of the Elements. The book is unfinished, but the poem inside it reads:
Northward, haunted northern coastline
And south, Dwemer live and toil
A simple place, a shield from draft
At this stand wield mage’s craft
So fierce the sea will boil
The poem mentions an area outside Dawnstar called Windward Ruins. Head over there, enter the Barrow and place the book on the pedestal. The next step is to cast the fire spell on the book, which, for some reason, adds another verse to the poem:
Under Greybeards’ morning shadow
At this northern watch, long lost
Nirn’s hoary Throat does scrape the sky
Here unleash a chiling cry And gild this stand with frost
The new verse metions North Skybound Watch which is located in the Throat of the World. Head to the area and locate the stone lookout post where you can place the book and cast the fire spell to get another verse.
Over western river waters,
By Karth bounded, south and north
On mountains sits a humble crown.
Sky’s wrath on this stand bring forth
To shake these snowcaps down
The final verse mentions the Four Skull lookout near Karthwasten. The pedestal you want is behind the stone building, place the book and cast the lightning spell of your choice. This will give you the firestorm spell. Now you can also purchase tomes for Lightning Storm and Blizzard from Faralda.
Need more help? Here are some Skyrim guides that may help: