When the error “0xC000021A” is displayed on Windows 10 as a BSoD (Blue Screen of Death), it usually means that there are issues with the user-mode subsystem. The two user-mode subsystems of Windows are WinLogon and Client Server-RunTime Subsystem (CSRSS), which are necessary for the correct operation of Windows 10. If these two are not working properly, it leads to errors like “0xC000021A,” preventing Windows from running properly.
In case you encounter the error “0xC000021A” of another form, it may also display as: STOP 0xC000021A, or STATUS_SYSTEM_PROCESS_TERMINATED (Status System Process Terminated), HALT: c000021a {Fatal System Error}, STOP c000021a.
How to Fix Windows 10 Error 0xC000021A
The error “0xC000021A” on Windows 10 may occur for many reasons. You may appear to have misconfigured or malfunctioned software and driver, or your system registry is damaged due to various errors and power outages. However, do not sweat over the many reasons for Windows 10 “Error 0xC000021A” because we are here to help.
Fix #1: Fix Corrupted System Files (Recommended)
Windows 10, although it’s been a while since it came out, still has stability issues. Corrupted system files are a common problem in Windows 10, which can cause many issues, including high CPU usage, Blue Screen of Death, crashes, and more. To scan and fix corrupted files, use Restoro, a professional repair tool that fixes the most common Windows 10 and 11 errors. Download Restoro and run the scan to confirm what files are causing problems. Once the scan is complete, you click on Repair to fix and replace all damaged files on your PC.
Fix #2: Perform A Clean Boot
Performing a clean boot does a lot when fixing the Error 0xC000021A on Windows 10. A clean boot permits the users to troubleshoot errors like Error 0xC000021A in detail and doesn’t leave anything out.
For a clean boot, first, boot into the system, head to the Desktop icon, click on Start and press the R key to launch the Run utility. In the text box type “msconfig” and press Enter. Go to the General tab, select Selective startup and uncheck Load startup items. Then head to the Services tab, hide all Microsoft services, and click Disable. Next, go to the Startup tab, and disable all services by right-clicking each and clicking Disable. Finally, restart your PC, and you’re good to go.
Fix #3: Run The DISM Command
To follow through this fix, boot your Windows into Safe Mode through Command Prompt and run the DISM Command. After that, reboot your system and press F8 key before the Windows logo appears. Then, choose Troubleshoot, select Advanced Options, select Startup Settings, and click Restart. Press F6, and then type “dism /image: C:\ /cleanup-image /revertpendingactions” in the Command Prompt and Replace C: with the letter of the drive where your Windows 10 is installed. You can also run the following commands, “cd C:\Windows\WinSxS” and “move pending.xml pending.old”.
Fix #4: Reset Windows
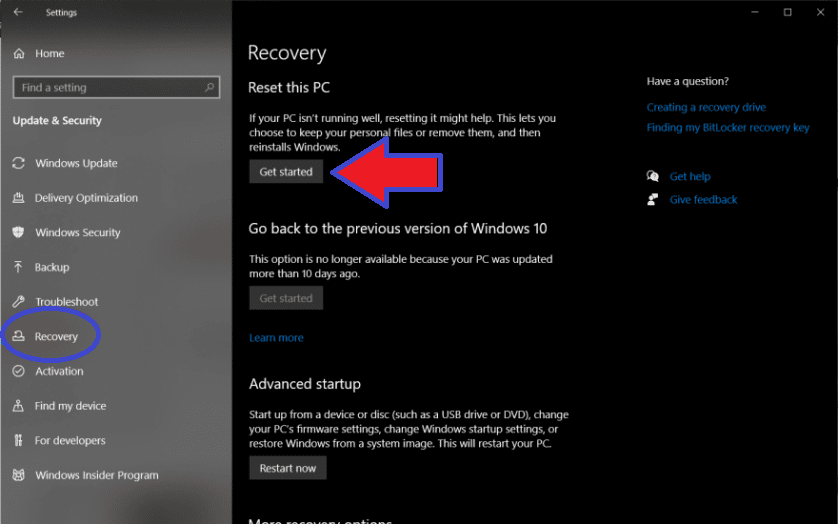
Open settings on Windows 10 and go to the Recovery Tab. Click on Get Started to start the process of factory resetting your Windows 10 operating system. You can have the option to pick and choose what apps and data stay or goes. We recommend removing everything from your Windows 10 and backing up the data you need to an external drive.

Fix Your Windows 10!
Use DriverFix to scan and update all outdated drivers on your PC in one click. Experience better PC performance and stability.

