Categories
Guides

Scorn Act 1 Walkthrough Guide

Scorn is making the rounds in the gaming community, and for all the good reasons. It possesses the ambiance of an atmospheric first-person horror game set in a very eerie nightmare-inducing environment that makes you second-guess everything. Scorn is an absolute masterpiece emulating the incredible artwork of H. R. Giger and Zdzisław Beksiński.

Considering, its alien technology, the game is undoubtedly a maze of tough puzzles and hurdles that occasionally render the players dumbfounded and unable to proceed further in the game. In this guide, you’ll be thoroughly guided through every step to successfully find a way through Act 1 of Scorn and cover the prologue many seem to struggle with.

Make sure you follow through each step of the Scorn Act 1 walkthrough, and beware of the obvious spoilers that you’ll be facing in the next section.

Act 1 Walkthrough

Scorn Act 1 is divided into a prologue and two other parts, so for your ease, we have described each section separately.

Prologue

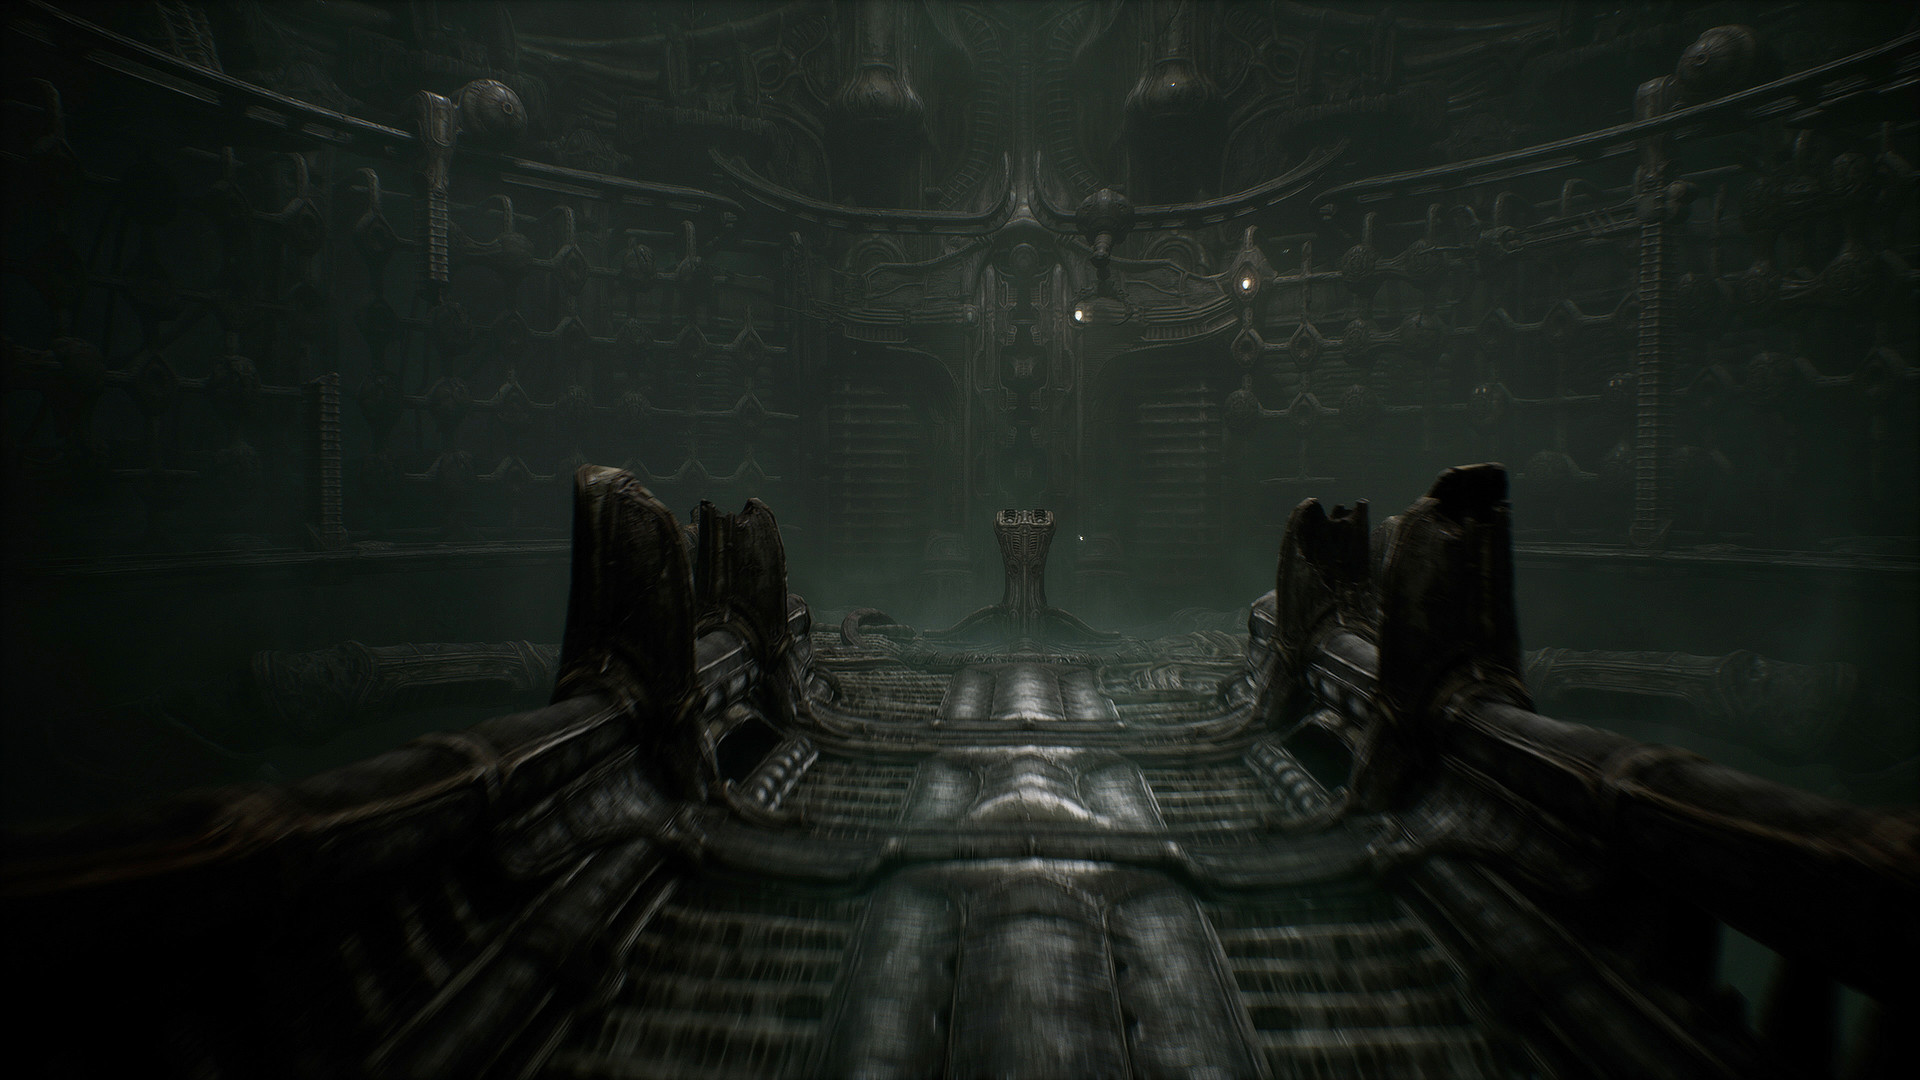
The prologue is the very introduction to Scorn, and you may be taken aback by the sheer horror and malicious vibes of the game. To proceed through the game, follow the steps described next:

  1. After the cutscene, you’ll face a door that is not interactive at first.
  2. Turn around and walk through the tunnel.
  3. You’ll now face an opening with a large alien structure.
  4. Continue through the tunnel.
  5. You’ll face another opening, a door to the left, a figure in the middle with a path spiraling around it to walk up it, and a path to the right.
  6. Head down to the path on the right.
  7. At the end, you’ll find a door to interact with. Squeeze by it while passing through it.
  8. You’re now in the next room.
  9. After facing the skeleton, go left and put your hand inside a phallic-looking pillar.
  10. Put both your arms in the pillar in the middle of the room.
  11. Interact with every side door to open it.
  12. Quickly run through the newly opened door.
  13. Walk through the tunnel, and now you’ll rise from the bottom of the structure with a path spiraling around it.

Scorn Act 1 – Part 1

  1. Go through the first path to the right.
  2. In the shell-like seat room, go to the alcove on the left and interact with the pillar to go up.
  3. You’ll reach an opening.
  4. You’ll come to a room with a large structure in the middle.
  5. Explore the area, and you’ll find an elevator to go up.
  6. Here You’ll see shell-like items as eggs.
  7. In this pillar, you’ll be solving the egg puzzle.
  8. After solving the puzzle, go back to the lift from earlier and go back downstairs.
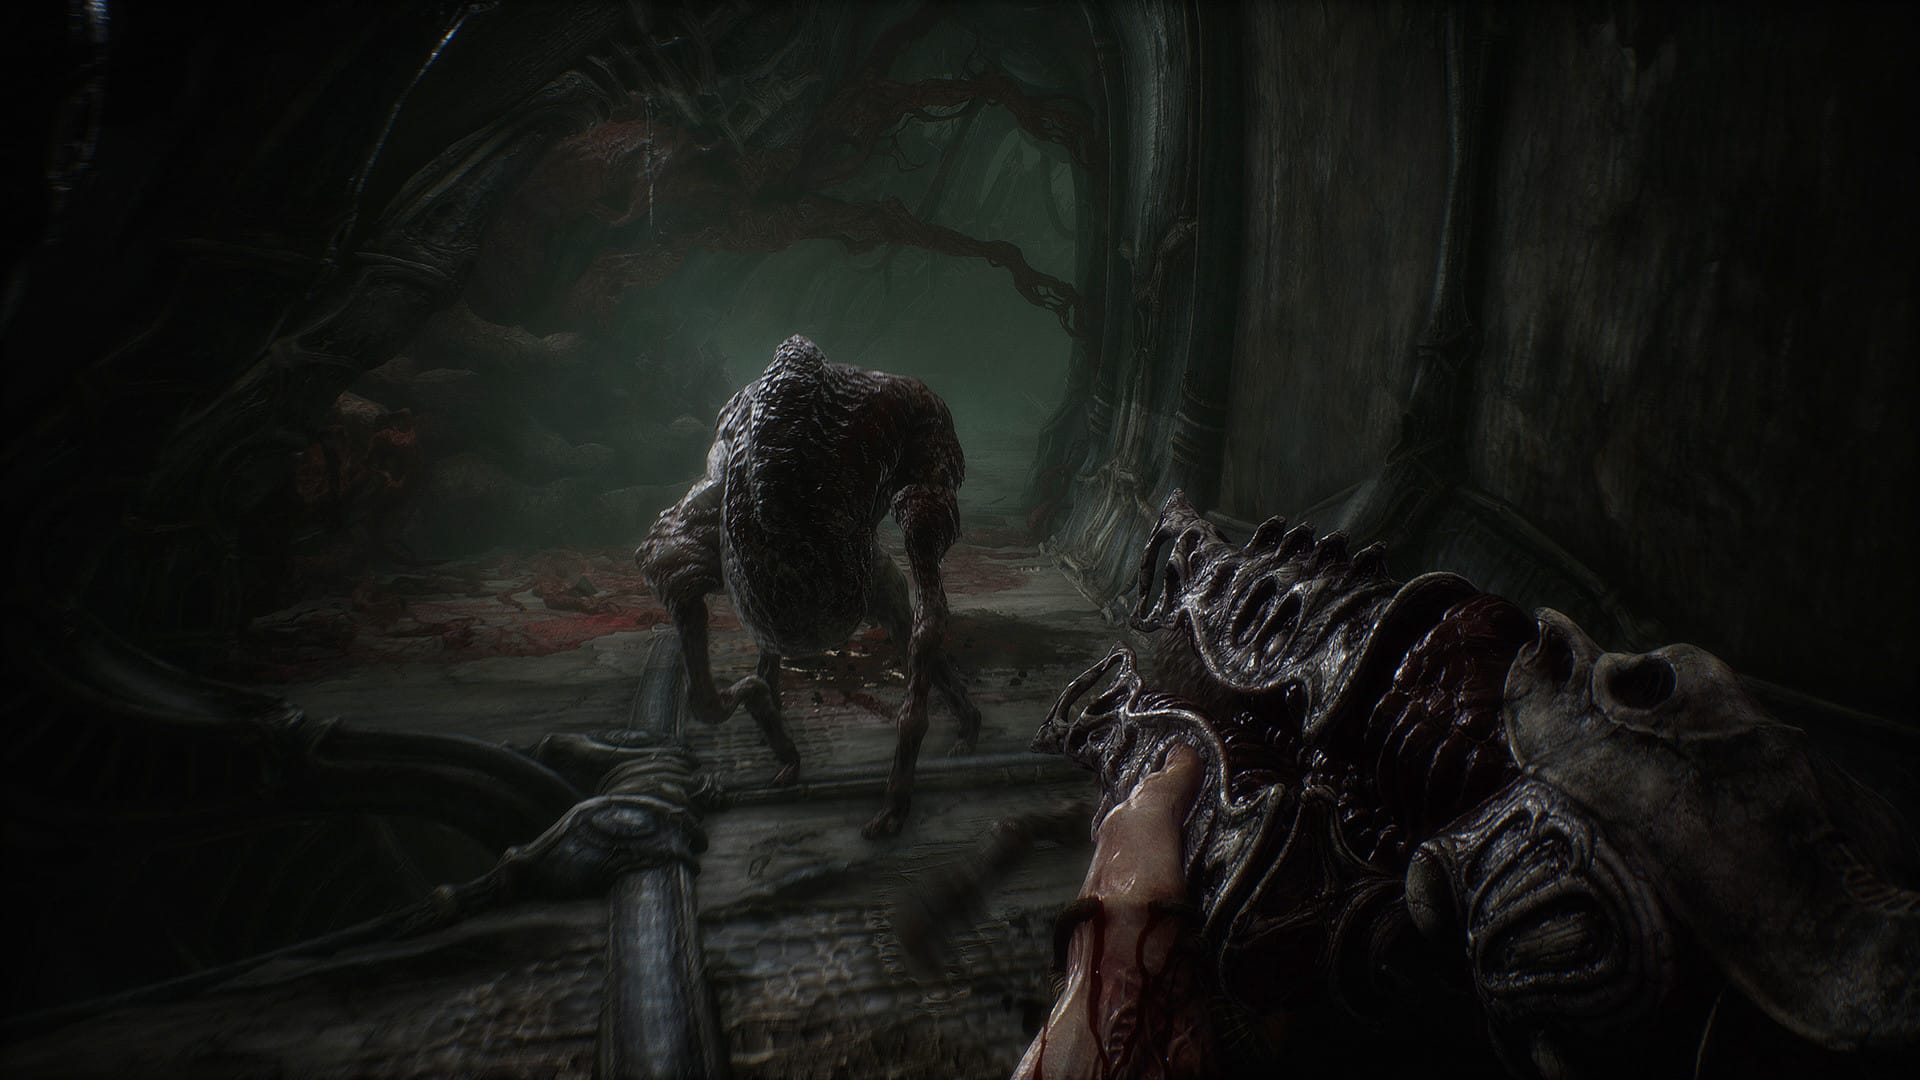
  9. In the main room, you’ll hear the creature making eerie sounds.
  10. Look up, and you’ll see it dangling up above.
  11. Below the creature, you’ll see a cart and a control panel next to it.
  12. Interact with it to control the claw and utilize it to catch the creature and put it on the throne.
  13. Ascend the stairs in the room and interact with the pillar at the top to adjust the tracks.
  14. Push the creature along the tracks into the room with an empty skeletal seat.
  15. Interact with the control panel and use the claw to pick the creature and move it to the seat on the right.
  16. Interact with the small control panel to remove the shell from it.
  17. When the creature stands, it’ll follow you, so exit to an illuminated room and force its hand inside the phallic structure.
  18. Make the creature put its arm in the pillar on the left.
  19. Put your arms into the pillar on the right, and sprint through the door ahead.
  20. Head to the next pillar and ascend to the other elevator.

Act 1- Part 2

  1. Keep left in the next room and walk through the tunnel.
  2. Head to the main room and keep left.
  3. Stand on the pedestal on the pipe-like structure, and then a pillar will rise.
  4. It will reveal the first weapon to collect.
  5. Go to the first room with the control panel to interact with it.
  6. 4-5 luminescent enemies and a capsule will appear.
  7. The capsule will be collected and moved by a claw.
  8. Follow the claw and use your weapon to get rid of bulb enemies.
  9. Go to the control panel and use your arms to control a helmet-like item to move the capsule along the tree-like structure.
  10. After slotting 2 capsules into the tree and interacting with their corresponding control panels.
  11. Go right.
  12. Interact with the control panel with a circular pedestal to reveal the final capsule.
  13. Go back to the tree and slot the final capsule in the tree.
  14. Put all your fingers inside the pillar.
  15. A cutscene will play.

That is all for our Scorn walkthrough for the game’s first act. For more on Scorn, also see How to Beat The Krang.

Categories
Tweaks and Fixes

How to Fix FIFA 23 Failure During Update Process Anti-cheat Error [Solved]

FIFA has always been at the top among sports video games, and with FIFA 23, nothing has changed. However, players report issues with the latest update, complaining that they couldn’t play FIFA 23 as the update doesn’t download. Players report the anti-cheat error when launching FIFA 23, and here are the fixes.

One reason behind the anti-cheat error could be an incomplete installation, resulting in corrupt files. An outdated launcher can also be a reason for the Anticheat issue. Re-installing the launcher for your game might help to eradicate that.

Nevertheless, these errors are quite common among games and require just a bit of your attention to fix them.

Fix 1 – Check the Server Status

FIFA 23 servers might be busy, causing the anti-cheat error as it fails to authenticate. It may be that the developers are working on a bug and need to shut down the servers temporarily. Either way, knowing the root cause determines the appropriate fix for it.

A third-party service, named Downdetector (https://downdetector.com/) is commonly used to check server status for many games.

Type FIFA 23 in the search bar and press Enter on your keyboard. After that, the current server state for your game will be listed. If it is reporting a problem, then you can just wait for the server to stabilize and turn on.

Fix 2 – Reinstall Anticheat

An incomplete and unstable installation for EA Anticheat may cause this error. So, reinstalling it after uninstalling it might work out.

  • First, get to the EA Anticheat folder by copying and pasting the following address into your file explorer:
    • C:\Program Files\EA\AC
  • Then, run the file as administrator by Right clicking EAanticheatinstaller.exe.
  • You can select Fifa23 from the screen’s drop-down menu at the top right corner. After that, the anti-cheat will uninstall.
  • Once done, click on install.
  • After that, try running the game directly from its executable.

Fix 3 – Repair Corrupt Files

This fix was reported to be the most reliable as it worked out for many FIFA 23 players.

  • To apply this, just launch Origin.
  • Go to My Library and open FIFA 23.
  • After that, find the settings icon near the play button.
  • Then, click on repair and wait for it to complete.

Once the processing completes, the game will launch without any errors or crashes.

Fix 4 – Uninstall Unnecessary Anticheat

Uninstalling every other Anticheat application on your PC can also fix this problem. This fix is a little complicated, so just follow the steps below:

  • Press the Win + R keys to launch the Run Program. Open the Control Panel via the Run Program.
  • Then, look for the Programs section and head there.
  • After that, look for Faceit Anticheat.
  • Then, uninstall Faceit Anticheat by right-clicking your mouse and selecting the Uninstall option.

After uninstalling, restart your system to refresh things and run FIFA 23 again.

I hope the solutions have worked out for you, and if they haven’t, then look at them again in case you’ve skipped a step or two by mistake. If you are facing other errors and issues with FIFA 23, then also see our errors and fixes for the game.

Categories
Overwatch 2

The Best Overwatch 2 Controller Settings

If you play Overwatch 2 on a gaming controller, you must have the best settings. Playing the game becomes a laborious task if the key binds are not set properly for the controller. So what we’re gonna do here is, we will give you the best settings for controllers that will overall improve your game command and help you achieve those high ranks you so desperately desire.

You must note that these settings are only general advice, and some options will defer depending on your preference. For example, the sensitivity settings may need to be tweaked according to your liking. So, feel free to vary any of these settings to your liking until you find something that suits you the best.

Best Setting Controller Settings For Overwatch 2

  • Horizontal Sensitivity – 50
  • Vertical Sensitivity – 35
  • Under Advanced: Aim Assist Strength – 100
  • Aim Assist Window Size – 70
  • Aim Assist Legacy Mode – Off
  • Aim Assist Ease In – 30
  • Aim Smoothing – 0
  • Aim Ease In – 30
  • Invert Vertical Look – Off
  • Invert Horizontal Look – Off
  • Vibration – Off
  • Swap Movement/Aim – Off
  • Legacy Movement/Aim – Off
  • Aim Technique – Linear Ramp
  • Enable DualSense Trigger Feedback (PS5 only) – Off

Best Settings For Nintendo Switch Overwatch 2 Controller (Advanced Gyro Settings)

  • Gyro-Aiming YAW Axis Sensitivity – 15
  • Gyro-Aiming Roll Axis Sensitivity – 25
  • Disable Gyro while using Stick – On
  • Gyro-Aiming Pitch Axis Sensitivity – 18
  • Invert Gyro-Aiming Pitch Axis – Off
  • Invert Gyro-Aiming YAW Axis – On
  • Invert Gyro-Aiming Roll Axis – Off

You can tweak the settings by choosing whatever suits you the best, depending on your main hero. It would be better if you tried these settings before playing any matches in the same training area. Better to test your controls before plunging into a real match.

No doubt playing Overwatch 2 will be tough for many players, even those not using the appropriate settings on their controllers. We hope these settings tricks have worked for you, and you can continue playing to the best of your ability.

That’s all we have for the time being, but if you need more help, here are some more Overwatch 2 guides you may find helpful:

Categories
Guides

Scorn Act 2 Walkthrough With All Puzzle Solutions

Scorn is a bone-chilling experience, born out of the darkest imaginations of H. R. Giger & Zdzisław Beksiński. This game brings out that unnerving feeling that makes you want to escape the gameplay as soon as you enter it, yet, you can’t stop playing.

In this guide, we’ve covered the Scorn act 2 walkthrough, explaining all the different steps and tasks in detail. So, continue reading, and you’ll be out of the maze and puzzles this game throws at you.

You’ll find yourself in a landscape environment as soon as the act initiates. However, this won’t be for long, as you’ll be heading back inside elegant buildings filled with creatures of nightmares once the act is complete.

At first, when set in the empty landscape, you’ll notice dead aliens and purple sand all around you. Start moving your foot one at a time and look around the space, going over the different places. Soon, you’ll see a gate in front of you after some looking around. Pass that gate, and start looking for a second one.

Once you pass the gates, a huge building will appear before your eyes. You won’t be able to enter through the front, as it always is in these types of games. So, go around the building and look for a tunnel. Once found, go inside it.

After you cross the tunnel, a second tunnel will appear in front of you. You’ll need to completely shut off your claustrophobic impulses and head into it.

Soon, you’ll encounter a shattering noise someone caused while breaking a bone window. Follow the noise and interact with the broken window to get inside. Once inside, head to the left, where you’ll have a slight encounter with an alien that will run away as soon as you get in.

Keep to the left, and don’t stop until a second exit appears. Take it and look for a corpse holding an item when it does. Take the item away by interacting with it and apply it to the pillar next to it.

Use the item by turning it in the pillar to a topmost position and interacting away from it. Afterward, head back to the first exit you skipped and enter it. You’ll find a gate by the left, which you can open using your new tool.

Once the gate is opened, interact with the pillar next to it to bring the lift down. Get on to it and let it take you. Once the elevator stops, head to the right, interact with the button that appears, and takes the left route from the three presented to you.

After that, several pillars will keep on appearing in front of you. So, interact with them using the new tool you’re equipped with. Do this till you reach a pillar with a corpse.

Once that completes, head back to the tunnel and locate a vent in the leftmost tunnel. After that, cross the tunnels until you approach three valves you’ll need to pull to turn off a fan.

Head back to the tunnels; this time, you’ll get a new weapon on the way back. Get it and keep heading back until the vent you got in with appears. Once you get out, keep at left and find a pillar to interact with.

An elevator will appear, get onto it and out once it stops. A pillar will appear ahead of you that you’ll need to interact with using your arm. While at it, interact with another pillar as well using your weapon.

All of this will take you back to where you came from, surprising you a bit when playing it without a walkthrough. Keep heading back, and you’ll reach the red room.

Look around a bit for another tunnel passage, get into it and keep heading straight till you reach a tunnel blocked with dead bodies. Remove them by moving the pipe and activating it.

Now, head back to the button you pressed to get in here and wait to arrive at a final pillar. Open it and head back to the red room of flower buds.

After that, a sequence of puzzle-type tasks will appear ahead of you, which you’ll need to match and compare intellectually to solve. You can reference the egg puzzle guide from the following link to get an idea of the types of problems you’ll face.

Once the above sequence completes, an alien bud will come to fruition, and an absurd creature will rise from it and dies just after its birth. Maybe this will be a sort of symbolism that will show in the story’s narrative.

Just pass through some new gates before you reach another elevator that will take you to a machine. Once you get near it, it will poke at the crab item that belongs to you. This will help you in regeneration and healing afterward.

Once done with all that, a final tunnel will appear that will take you back to the location of Act I. Head to the right and unlock a door at the end of yet another tunnel. This will take you to a lift shaft you can use to descend, bringing the Act II to its completion.

Categories
Tweaks and Fixes

How To Fix Overwatch 2 Error Code LC 208?

Overwatch 2 has been so great and is a sizable leap from Overwatch that has taken up quite a mark on the first-person shooter game genre. However, there are users that are now reporting facing an “Error Code LC 208” while playing Overwatch 2, and in this guide, we will help you with how to fix the error.

Mainly the “Error Code LC 208” emerged on Overwatch 2 due to network connectivity issues and lack of optimization. The following are the fixes that will help you with the error.

Fix #1- Check Overwatch 2 Servers

It’s always a good idea to rule out in-game issues like Overwatch 2 “Error Code LC 208” first by checking up on the official game servers to see if the issue has been declared universally by the developers themselves. To check the status of Overwatch 2 serves, you can:

  1. Head over directly to https://us.forums.blizzard.com/en/overwatch/. And go over to the announcements section.
  2. You can also head over to a third-party website https://downdetector.com/ to further check on the updates.

Fix #2 – Check Your Internet Connection

Since Overwatch Error Code LC 208 is solely a network connectivity error, it would be wise to switch to a better internet connection to tackle the error firsthand.

  1. You can check your internet speed through websites like “Speed test by Ookla”
  2. In case of bad wifi, reach out to your internet provider to get a better internet connection.
  3. Try switching to the hotspot to check whether it even is an internet connection issue in the first place or not.
  4. Use a VPN

Fix #3 – Change Your Region

Overwatch 2 Error Code LC 208 occurs due to inconsistencies with the selected region of your account. Many users change their region due to several reasons. However, a correct region selection often solves “Error Code LC 208”. To change your region:

  1. Click on the globe icon visible on the screen of Overwatch 2 above the settings option.
  2. Several regions will appear to choose from the list.
  3. Click on the region that exactly comes closest to yours.

Improve Your Gaming Experience

Try NordVPN.
NordVPN has more than 5600 VPN servers in 59 countries, making your gaming experience as smooth as possible. Black Friday deals are available now!

That is all for our fixes for Overwatch 2 Error Code LC 208. If you face other errors and issues with Overwatch 2, check our errors and fixes guide. If you are facing errors and issues with other PC games or your PC, then also see our hub for commonly occurring PC errors and their fixes.

Categories
Tweaks and Fixes

How To Fix WSL Not Working After Upgrading to Windows 11?

Windows 11 users face an error when they launch the WSL (Windows Subsystem for Linux) right after upgrading their Windows to Windows 11. To correctly tackle Windows 11’s WSL crash, we discovered several causes along with the fixes.

Why Is WSL Not Working On Upgraded Windows 11?

  • Disabled Virtual Machine – For a successful switch to another OS in Windows, one must enable the visual machine feature.
  • Disabled WSL – Similar to a virtual machine, it is also necessary to enable WSL when the root of the problem is just that.
  • Faulty Updates
  • Corruption Errors and Malware Accumulation

Having a brief overview of the legitimate causes of the “WSL Not Working On Upgraded Windows 11” matter, upon proceeding further, you will find out exactly how you can solve it through a variety of credible fixes.

Fix #1 – Enable WSL

As the name suggests, it is essential that you first enable the WSL if it hasn’t been enabled already. To do so, follow the steps described next:

  1. On the Windows taskbar search bar, type “Turn Windows features on or off”
  2. Click Open
  3. In the popped-up dialog, head over to Windows Subsystem for Linux.
  4. Put a checkmark on the box next to it.
  5. Click on OK to finalize the process.

Fix #2 – Enable Virtual Machine

Virtual machines are an important feature necessary to run multiple operating systems on one hardware. If you’ve already ruled out the WSL disabled option, then you’ll definitely have to make sure that virtual machines is enabled as well. Proceed ahead to find the steps to do so:

  1. On the Windows taskbar search bar, type “Turn Windows features on or off”
  2. Click Open.
  3. In the popped-up dialog, head over to Virtual Machine Platform.
  4. Put a checkmark on the box next to it.
  5. Click on OK.

Fix #3 – Scan For Malware

As mentioned previously, malware in the system could also lead to the recently upgraded Windows 11 crashing the WSL. To scan for any such malware bugs, use the Windows Defender’s malware scan to effectively diagnose and solve the problem:

  1. On the Windows taskbar search bar, type Windows Security.
  2. Open it.
  3. Click on Virus & threat protection option.
  4. Click on the Scan options hyperlink.
  5. Click on Full Scan and then on Scan now.

If you have third-party anti-virus software, use that to ensure there is no malware in your system.

Fix #4 – Repair/Reinstall Linux Distribution

Another reason WSL isn’t working on Windows 11 is the corrupt Linux Distribution app. First, try to repair the app and see if that works for you. If repairing the app doesn’t make WSL work on Windows 11, delete the Linux Distribution app and reinstall it.

Fix #5 – Delete Recent Updates

If Windows 11 users are encountering the WSL not working issue with the installation of recent updates, then the updates are causing the issue. It’s quite common for Windows users to experience such issues with OS updates. To fix the issue, uninstall recently installed OS updates. Open Control Panel > click on “View installed updates” > the next window will list the installed updates. Uninstall the most recent one, which should fix the WSL not working on the Windows 11 issue.

That is all for our fixes for WSL Not Working On Windows 11. If you are facing errors and issues with other PC games or your PC, then also see our hub for commonly occurring PC errors and their fixes.

Categories
Tweaks and Fixes

How To Fix Desktop Windows Manager & Client Server Runtime High GPU Usage

Recently, many Windows 10 and 11 users are experiencing High GPU Usage of dwm.exe and csrss.exe, which are the Desktop Windows Manager and Client Server Runtime, respectively. This occurred after they installed an update on their computer.

GPU, the graphical processing unit in simple terms, is a piece of hardware responsible for accelerating the creation of images. However, overusing them can lead to overheating of graphic cards, making your computer sound like the engine of an airplane.

Why Is The GPU Being Overused

After some research into the matter, we narrowed down the issue to some core reasons that are most apparent in the community.

Many reported the problem mostly appearing when they tried to drag over a third-party browser across the screen. This resulted in a High GPU usage of the dwm.exe and csrss.exe, because of the high calculations a browser requires for graphical rendering.

People also reported a rise in the GPU usage of Desktop Windows Manager & Client Server Runtime when they install a game or application that requires a lot of calculations for graphical rendering.

Perhaps, it is that you have a pending windows update, which can also be the reason for High GPU Usage because most updated versions don’t have this problem anymore.

Other than that, it may simply be that you have set the priority of Desktop Windows Manager & Client Server Runtime high, which might be the main reason for the rise in GPU processing.

Apart from all that, there could be plenty of other reasons. Such as outdated Intel and GPU drivers, underclocked GPU frequencies or some 3rd party interference.

Fix 1 – Install the Pending Windows Updates

As mentioned earlier, High GPU Usage is a fairly old problem that Microsoft has resolved in its current versions. So, if your Desktop Windows Manager and Client Server Runtime are taking all the GPU juices for themselves, then follow the steps below to terminate this problem once and for all:

  • Press Win+ R keys to launch the Run Program.
  • Type in “ms-settings:windowsupdate” and hit Enter.
  • This will take you to the Windows Update section of Settings.
  • A UAC window may appear for your permission for some rights. Select yes if you haven’t before.
  • On the right side of the screen, you’ll find a Check for Updates button.
  • Press the button.
  • After the update is downloaded, go ahead and install it.

Once installation is completed, restart your PC and the high CPU usage issue will be fixed.

Fix 2 – Switch to Efficiency Mode

As we discussed earlier, the Usage of GPU by Desktop Windows Manager and Client Server Runtime can be due to it being set to a high priority in the first place. Follow the steps below to change the status of dwm.exe and csrss.exe to Efficiency Mode:

  • Open Task Manager by pressing the Ctrl + Alt + Del buttons.
  • Once the window pops up, get into the Expert interface.
  • Locate the Process Tab and look for Desktop Windows Manager in the list.
  • Right-click on it and set it to Efficiency Mode.
  • Do the same for the Client Server Runtime.

Once the procedure completes, restart the computer to see if the GPU processing has reduced.

Update GPU driver

Outdated GPU drivers can also cause high GPU usage in Client Server Runtime and Desktop Window Manager. Updating the GPU drivers can fix the issue. Download and install the latest GPU drivers from your respective provider and do a clean installation. This will reduce GPU usage.

Turn Off Hardware Acceleration

Windows 10 and 11 offer a Hardware Accelerated GPU scheduling. This particular feature is still being worked on but, in theory, should allow users to utilize their GPUs to their maximum capabilities. However, enabling Hardware Accelerated GPU scheduling can also cause high GPU usage with Client Server Runtime and Desktop Window Manager. Disable this feature, and the issue will be fixed.

For Windows 11, open Settings > Display > select Grraphincs under Related Settings > Change default graphics > turn off Hardware Accelerated GPU scheduling and restart your PC.

Windows 10 users must navigate to Settings > System > Display > Graphics Settings > turn the toggle off and restart their PC. This will reduce GPU usage.

Conclusion

High GPU Usage of Desktop Windows Manager and Client Server Runtime is concerned with some old problems that used to occur in previous updates. Now that the problem is diminished, the solution lies in installing the pending updates and lowering their priority.

If you are facing errors and issues with other PC games or your PC, then also see our hub for commonly occurring PC errors and their fixes.

Driver Issues?

Tip: If you’re having driver issues, we recommend using DriverFix to scan and update all your outdated drivers in just one click. DriverFix solves your issues faster; it is easy to use and lets you know whenever a driver update is available.

Categories
Tweaks and Fixes

How To Fix Slow File Transfer Speed On Windows 10/11

No one likes waiting for files to transfer when other things are pending too that you need to get done with. Even worse is when the file transfer takes ages to finish. And that seems to be a prevalent issue in Windows 10 and 11. Many users complain of slow file transfer regardless of where the files are being transferred to and from. Here is how to fix slow transfer speed on Windows 10/11.

Whether it’s a file transfer from an internal device, between two computers, or from and to an external device, the files still transfer sluggishly. To fight the cause of the problem, we dug around and found many plausible causes as to why one may be facing the issue. To start off, there may be system file corruption or any third-party software interference. The following fixes will help you with the slow file transfer speed issue on Windows.

Fix 1 – Run System Error Check Scan

The first thing mentioned previously regarding slow file transfer on Windows 10 and 11 was system file corruption. So, in such cases, you’ll have to run a system check scan to help identify and solve the problem. The great thing about this fix is that the tool needed to run the scan is conveniently present in Windows 10 and 11. To run the scan:

  • Press Windows and E keys simultaneously to open File Explorer.
  • Head to This PC option.
  • Right-click on the drive experiencing slow transfer when transferring files in and out of it.
  • Click on Properties.
  • Select Tools.
  • Click on the Check button next to Error checking.
  • Click Yes.
  • Click on Scan drive.
  • When the driver is found, repair all the errors.

Driver Issues?

Tip: If you’re having driver issues, we recommend DriverFix to scan and update all your outdated drivers in just one click. DriverFix solves your issues faster; it is easy to use and lets you know whenever a driver update is available.

Fix 2 – Enable Defragmentation Service

This fix is for users with the slow file transfer issue on the traditional HDD that had never been defragmented. So, in such a case, one needs to reconfigure the Optimize drivers service and configure it to Automatic. To follow through the steps:

  • Press the Windows and R keys simultaneously.
  • Run dialog box will pop up.
  • In the text box type ‘services.msc’.
  • Press Ctrl + Shift + Enter.
  • Click Yes.
  • The Services screen will show up now.
  • Select Services (Local).
  • On the right tab, scroll down to Optimize Drives.
  • Once you’ve fallen upon the correct service, right-click on Optimize Drives.
  • Click on Properties.
  • Click on the General tab.
  • Change the Startup type to Automatic.
  • Click on Apply to save the changes.
  • Reboot/Restart your PC.

That is all for our fixes for slow transfer speed on Windows 10 and 11. If you are facing errors and issues with other PC games or your PC, then also see our hub for commonly occurring PC errors and their fixes.

Categories
Tweaks and Fixes

Fix: Windows PIN Error 0x80280013 [SOLVED]

Windows PIN code feature, an extension of Windows Hello, allows you to log into the device using a pin. Though it may seem the same as Windows Password, it is different in more than one way. It is merely there for an extra security feature, adding a layer of protection that is only specific to your device. However, users report Error 0x80280013 with Windows PIN feature, and here is how to fix it.

What is Error Code 0x80280013?

Recently, users reported an issue with their PIN code not working properly. The error pops up as soon as they type in their PIN, saying, “Something went wrong, and your PIN isn’t available.”

First, it could be that the file location for PIN and its information is corrupted at the root, the NGC folder. Other than that, it could be that a problem occurred during the system’s boot-up. In this case, you’ll need to rectify the issue via boot utilities. Besides that, it could very well be that your error is being caused by some corruption in the system, causing your system to halt and perform weirdly.

Fix 1: Login Via Password

As mentioned earlier, the password is an alternative method of logging into your device. So, it is convenient to use the feature and then fix the Windows PIN Error 0x80280013 in the settings. Follow the steps below to get your PIN issue fixed:

  • Change the login option to Password and type in your password.
  • Once logged in, head over to Windows Settings through the Start Menu.
  • Locate Accounts on the left side of the window.
  • Find the ‘Sign in Options’ setting in the right window and open it.
  • Click on the drop-down menu and select the Windows Hello setting.
  • Click on Remove PIN.
  • Once removed, set up a new PIN.

Once done, boot up your computer and see if you can log in via the new PIN code or not.

Fix 2: Use System Restore Feature

If the above solution does not work, one thing to do is restore your Windows to a stable state to fix Windows PIN Error 0x80280013. This is similar to loading back to a saved game before a mess-up.

The System Restore Utility is a feature that Windows provides its users to handle problems that seem to be irreversible. This utility is responsible for storing snapshots of your device and all its statuses periodically. Follow the steps below to revert your system back to the most recent stable state:

  • First of all, shut down your computer.
  • After a while, turn it back On.
  • Hold the power button for 5 seconds during the bootup phase when the screen is in loading mode.
  • This will shut off the computer again.
  • When you do this three times consecutively, the system will boot up in safe mode.
  • A window will appear; select Troubleshoot setting.
  • Head over to the Advanced Settings.
  • In the list, look for the System Restore setting and open it.
  • A list of the system’s previous states will appear with the date and time.
  • Select the latest system snapshot that didn’t have the PIN code issue.

Once done, see if the PIN error has been resolved or not.

That is all for our fixes for Windows PIN Error 0x80280013. If you are facing errors and issues with other PC games or your PC, then also see our hub for commonly occurring PC errors and their fixes.

Categories
Tweaks and Fixes

How To Fix The DNS Server isn’t responding Error on Windows 10/11

Recently, Windows 10 and 11 users are experiencing the error “The DNS Server isn’t responding”, which appears while they try to run the network connections troubleshooter. DNS stands for Domain Name System. DNS on your computer is responsible for translating human-readable domain names to machine-readable IP addresses. If there are any inconsistencies with the DNS, you’ll face a block while opening websites on the internet. And even when users try to run the network connection troubleshooter, they run into a DNS error stating, “The DNS Server isn’t responding.” Is this error a shortcoming, or is it something about your internet service provider? Well, as it turns out, the problems with DNS could be due to several reasons. Most commonly, the error occurs due to a corrupt DNS cache that builds up over time. At other times, many users unknowingly have unsupported DNS that may eventually need to be changed to automatic or manual to repair. Whatever might be the cause of the issue, there are still present ways that many users have tried to fix the DNS error.

Fix# 1 – Power Cycle Your Router

First and foremost, you must rule out this simple fix to see if that’s what needs to be done. So, you’ll need to power cycle your internet router. Power cycling is very similar to restarting the router. However, there are a few simple differences. Below are the steps:

  • Unplug your router’s charger from the outlet.
  • Wait for 2 – 3 minutes maximum.
  • Plug the charger back into the electric outlet.
  • Turn the router back on.

Fix# 2 – Flush The DNS

As mentioned earlier, with time, some DNS caches can build up, leading to DNS Server isn’t responding error. It most likely happens when you have an invalid or outdated DNS address. In such cases, to fix the issue, you need to flush the DNS. Next, you’ll find the steps to do so:

  • Head to the Start Menu.
  • In the search bar, type “command prompt”
  • When it appears, right-click on it and run it as an administrator.
  • In the typing box of the terminal, type the following commands and press enter after each of them
    • ipconfig /flushdns
    • ipconfig /registerdns

Fix# 3 – Reset Winsock

Oftentimes, there are incorrect and/or corrupted entries to the Winsock catalog. So, what you’ll need to do in such cases is simply reset the Winsock, and that will solve the “DNS Server isn’t responding” error. To do so, follow these steps:

  • Head to the Start Menu.
  • In the search bar, type “command prompt”
  • When it appears, right-click on it and run it as an administrator.
  • In the typing box of the terminal, type in the following command and press enter.
    • NETSH winsock reset catalog

That is all for our fixes for the DNS Server isn’t responding error on Windows. Also, see our hub for commonly occurring PC errors if you are experiencing other errors with your PC and video games.

Be Anonymous, Get NordVPN

Protect your identity and personal information with NordVPN. Black Friday deals Up to 68% off.