Categories
Tweaks and Fixes

Fix Windows 10 Error 0xC000021A in 2 Minutes

When the error “0xC000021A” is displayed on Windows 10 as a BSoD (Blue Screen of Death), it usually means that there are issues with the user-mode subsystem. The two user-mode subsystems of Windows are WinLogon and Client Server-RunTime Subsystem (CSRSS), which are necessary for the correct operation of Windows 10. If these two are not working properly, it leads to errors like “0xC000021A,” preventing Windows from running properly.

In case you encounter the error “0xC000021A” of another form, it may also display as: STOP 0xC000021A, or STATUS_SYSTEM_PROCESS_TERMINATED (Status System Process Terminated), HALT: c000021a {Fatal System Error}, STOP c000021a.

How to Fix Windows 10 Error 0xC000021A

The error “0xC000021A” on Windows 10 may occur for many reasons. You may appear to have misconfigured or malfunctioned software and driver, or your system registry is damaged due to various errors and power outages. However, do not sweat over the many reasons for Windows 10 “Error 0xC000021A” because we are here to help.

Fix #1: Fix Corrupted System Files (Recommended)

Windows 10, although it’s been a while since it came out, still has stability issues. Corrupted system files are a common problem in Windows 10, which can cause many issues, including high CPU usage, Blue Screen of Death, crashes, and more. To scan and fix corrupted files, use Restoro, a professional repair tool that fixes the most common Windows 10 and 11 errors. Download Restoro and run the scan to confirm what files are causing problems. Once the scan is complete, you click on Repair to fix and replace all damaged files on your PC.

Fix #2: Perform A Clean Boot

Performing a clean boot does a lot when fixing the Error 0xC000021A on Windows 10. A clean boot permits the users to troubleshoot errors like Error 0xC000021A in detail and doesn’t leave anything out.

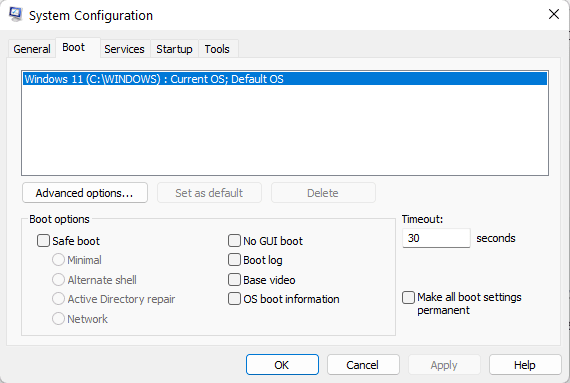
For a clean boot, first, boot into the system, head to the Desktop icon, click on Start and press the R key to launch the Run utility. In the text box type “msconfig” and press Enter. Go to the General tab, select Selective startup and uncheck Load startup items. Then head to the Services tab, hide all Microsoft services, and click Disable. Next, go to the Startup tab, and disable all services by right-clicking each and clicking Disable. Finally, restart your PC, and you’re good to go.

Fix #3: Run The DISM Command

To follow through this fix, boot your Windows into Safe Mode through Command Prompt and run the DISM Command. After that, reboot your system and press F8 key before the Windows logo appears. Then, choose Troubleshoot, select Advanced Options, select Startup Settings, and click Restart. Press F6, and then type “dism /image: C:\ /cleanup-image /revertpendingactions” in the Command Prompt and Replace C: with the letter of the drive where your Windows 10 is installed. You can also run the following commands, “cd C:\Windows\WinSxS” and “move pending.xml pending.old”.

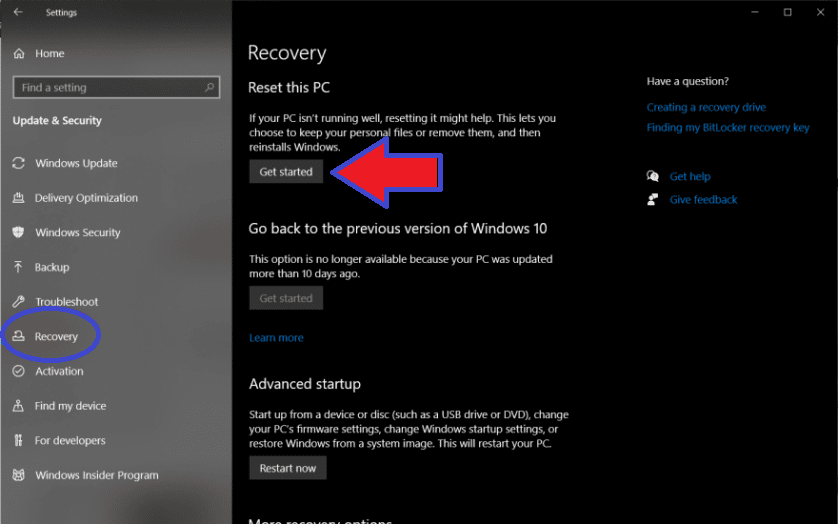
Fix #4: Reset Windows

Open settings on Windows 10 and go to the Recovery Tab. Click on Get Started to start the process of factory resetting your Windows 10 operating system. You can have the option to pick and choose what apps and data stay or goes. We recommend removing everything from your Windows 10 and backing up the data you need to an external drive.

Fix Your Windows 10!

Use DriverFix to scan and update all outdated drivers on your PC in one click. Experience better PC performance and stability.

Categories
Tweaks and Fixes

Fix Error 0x00000709 “Cannot Set Default Printer” on Windows

The printer connected to your PC is pretty straightforward, but an error might occur if something goes wrong every now and then. Recently, people have been reporting an error message popping up out of nowhere, known as Error Code: 0x00000709 Cannot set default printer” this error is causing serious annoyance.

How to Fix Error 0x00000709 “Cannot Set Default Printer”

The problem usually resides under one to two core reasons. Click on the printer icon from the taskbar to see its connection status and to know if it’s connected to the network. If that doesn’t give you a hint, then the problem either lies in corrupted system files or a problematic registry key.

Fix #1: Fix Corrupted System Files

Windows 10 and 11 are known to have stability issues. Corrupted system files are a common problem in Windows, which can cause many issues, including Error Code 0x00000709. To scan and fix corrupted files, use Restoro, a professional repair tool that fixes the most common Windows 10 and 11 errors. Download Restoro and run the scan to confirm what files are causing problems. Once the scan is complete, you click on Repair to fix and replace all damaged files on your PC.

Fix #2: Change the Registry Key

Before getting into this fix, try to secure your older registry by backing it up. Also, note that any changes made to the registry can cause irrecoverable damage if not done correctly. With that out, start by opening the registry editor and searching for regedit in Start Menu. A UAC access permission will be asked; allow it and follow the path: “HKEY_CURRENT_USER\Software\Microsoft\WindowsNT\CurrentVersion\Windows.”

Double-click on the device icon and, type in your printer’s name, click Ok to save it. However, if an error message pops up, saying, “Cannot edit Device: Error writing the value’s new contents,” then right-click the Windows key on the right side and locate it in the Permissions section. Check the “Allow for Full control and read” box and proceed by clicking Apply and Ok. After that, right-click on the “UserSelectDefault” icon and rename it as your printer’s name.

Once you’ve applied your fixes, go ahead and reinstall the printer driver and restart your PC. See if the default printer is set up and whether the problem is resolved. If it is, then good for you. However, if you’re still facing issues, then try contacting the printer provider service to help you with the connection problem.

Fix #3: Update Drivers

Outdated drivers can be an issue, so we recommend using DriverFix, a professional tool that allows you to scan and update all outdated device drivers. Download the app and scan your system to see what drivers are outdated. DriverFix will present you with a complete report after its finished scanning.

Categories
Tweaks and Fixes

Fix Shell Infrastructure Host High CPU Usage in 2 Minutes

Certain Windows 11 users have noticed Shell Infrastructure Host process is using more than necessary CPU resources. This is causing Shell Infrastructure Host to take up the entire available CPU resources even while doing simple tasks like viewing photos on the system. High CPU usage by Shell Infrastructure causes the system to slow down, stutter, and sometimes crash.

How to Fix Shell Infrastructure Host High CPU Usage on Windows 11

We discovered that high CPU usage by Shell Infrastructure Host could be due to several reasons. Sometimes it’s due to bugs messing with the accumulated cache folder in Windows 11. It can also happen if certain hotfixes are not installed, or the Photos app is corrupted. There may also be interference from any third-party software causing high CPU usage. To make it easier for Windows 11 users, we have created a brief list of credible fixes with detailed steps that may help solve the issue of high CPU usage by Shell Infrastructure Host.

Tip: If you’re having trouble with Windows updates, high CPU usage, registry errors, drivers, and activation, we recommend using Restoro. This software will scan and fix your problem automatically. Try Restoro before applying the following fixes to rule out corrupted or malware-damaged files.

Fix #1: Fix Corrupted System Files

Windows 11 is a new OS, and even though it’s been a while since it came out, there are still stability issues. Corrupted system files are a common problem in Windows 11, which can cause many issues, including high CPU usage of the Shell Infrastructure Host. To scan and fix corrupted files, use Restoro, a professional repair tool that fixes the most common Windows 10 and 11 errors. Download Restoro and run the scan to confirm what files are causing problems. Once the scan is complete, you click on Repair to fix and replace all damaged files on your PC.

Fix #2: Reset Or Uninstall Photos App

The photos app is usually the main entity affected or causing the high CPU usage of the Shell Infrastructure Host. Oftentimes it needs to be reset or uninstalled altogether to solve the issue. If you uninstall it and it fixes the issue, you can use the alternate photos app to view photos because there is no permanent fix for the Photos app right now. Press the Windows and R keys simultaneously to open the Run dialog box, type “ms-settings” to open Settings, and select Apps. Next, select Installed programs, and search “photos” in the search box to head to the Photos app. Select the action icon for Microsoft Photos. Then click on the Repair button. The repair process will start and after it’s over, restart your computer.

If repairing doesn’t fix the problem, it is time to uninstall the Photos app. Use Windows Taskbar to search for add or remove programs. Find Microsoft Photos from the apps list and uninstall the program.

Fix #3: Use Alternate Default Photos App

If the current photos app is still causing high CPU usage by Shell Infrastructure Host, then you’ll have to switch to another and set it as the default Photos app. To replace Microsoft Photos with Windows Photo Viewer, press the Windows and R keys simultaneously to open the Run dialog box and type “ms-settings” to open Settings, click on Apps, then on Default apps. Scroll down the list and select the Photos app. On every entry that has Photos as the default program, change it to Windows Photo Viewer. Finally, save all the changes and then restart your PC.

Fix #4: Run System Maintenance Troubleshooter

When issues with the bug affect the cache folder, as mentioned earlier, high CPU usage by Shell Infrastructure Host is inevitable. To tackle this problem, follow the next steps to run the System Maintenance Troubleshooter.

First, press the Windows and R keys simultaneously to open the Run dialog box and type ‘control’ in the text field. Control Panel will launch. Search ‘troubleshooter’ in Control Panel, then in the Troubleshooting section, go under System and Security and select Run maintenance tasks. Then, click on the Advanced hyperlink and automatically check the box next to Apply repairs.

Click on Next, then click on Try troubleshooting as an administrator; it will start the utility. The troubleshooter will identify the issue and solve it. When that’s over, reboot your PC, and that’ll end. It is a common occurrence that CPU usage is affected by one entity or another. In the case of high CPU usage by Shell Infrastructure Host on Windows 11, many users are dumbfounded when trying to solve the issue. Following the steps described in our fixes, we hope we have cleared up the problem for you, and your CPU usage is now balanced.

Fix #5: Use a Solid Desktop Background

It is well established the Shell Infrastructure host is closely linked to basic graphical elements. It is possible that using a slideshow background or a dynamic background via some third-party software is causing high CPU usage. Click Start and select the Settings cogwheel from the menu. Open Personalization settings, and in the Background tab, select Solid Color or Picture as your background.

Fix #6: Install All Pending Windows Updates

As mentioned earlier, high CPU usage by Shell Infrastructure Host could happen if certain hotfixes are not installed. To install hotfixes on Windows 11, first press the Windows and R keys simultaneously to open the Run dialog box, then type “ms-settings: windows update” in the text box, press Enter, and then Yes on default UAC. On the launched window, select Check for Updates; this will start the update download locally, then click on Install Now for local installation. As the final step, restart your computer. Another method is to type Windows Updates in the Windows Search Bar to open the Windows Update Settings menu. Click on “Check for updates.”

Drivers Giving You Trouble?

Get DriverFix to automate your driver updates. Update all outdated drivers in just one quick scan.

Categories
Tweaks and Fixes

How to Fix Strawberrybeard Error in Sea Of Thieves

Sea of Thieves is an action/adventure game. It’s both single-player and multiplayer. As fun as it is, Sea of Thieves has several recurring errors which have become a problem for many players. Strawberrybeard is an error code troubling Sea Of Thieves players, and here is how to fix it.

Players have encountered the “Strawberrybeard” error in two ways. One of them shows up if they are in the insider program client, and they try to log in to the retail client after several weeks. To fix this issue, all you have to do is to close the insider program client and start Sea Of Thieves. Once you’re done, you’ll be able to move back into the insider program client and play the game without any further problems.

The second encounter players are experiencing is that it doesn’t let them play the game because the version of the game they are playing is not up to date with the latest version. Sea of Thieves is updated differently for both Xbox and PC players, but do not worry because we will provide you with all the information you need to update Sea Of Thieves and eliminate the “Strawberrybeard” error.

How To Update Sea Of Thieves On Xbox

You can update Sea of Thieves on Xbox by going into “My games and apps,” scrolling down, toggling on Manage, and clicking on Updates. Your Xbox will search for updates in all the games you’ve downloaded.

If there appears to be no update required, press the power button for a few seconds and unplug your Xbox for about 30 seconds, and plug it back in to restart your console. Now go back into the shop and see if any new updates are required.

How To Update Sea Of Thieves On PC

Players can update Sea Of Thieves on PC if they go to the Microsoft Store and click on the three dots at the top right border of the screen. Click “Download and Updates” and look for any updates required on your PC. If no updates are required, press the Windows key and type “wsreset” on the search bar to reset your entire Microsoft Store.

We hope this guide has helped you fix the Strawberrybeard error, and now you can play Sea Of Thieves without being interrupted by this error. If you are facing errors and issues with other PC games or your PC, then also see our hub for commonly occurring PC errors and their fixes.

Categories
Tweaks and Fixes

How To Fix Call of Duty: Modern Warfare 2 DEV Error 5479 [Solved]

Many recently reported that Call Of Duty Modern Warfare 2 isn’t performing very well. Apart from gameplay and overall experience, players around the globe have a new issue, Modern Warfare 2 suddenly crashes, and right after that, error code 5479 appears.

What is DEV Error 5479 and How to Fix it?

Since its launch, Call of duty Modern Warfare 2 has become more messed up daily. The game has many bugs and issues, including this game crash error. Sooner or later, this error will get fixed after a patch, but we don’t know how long that’ll take. So, try the fix we’ve got for you below and see whether it fixes your problem.

Dev Error 5479 Fix

The first thing you should do is restart your system, but first close the Battle.net launcher and the game. You should also close all software, including discord, Google, running games, websites, or any of the stuff that is being downloaded.

This is because an overlaying program can cause interruptions to the running game and cause this error. Furthermore, it creates a clean slate for the game, providing maximum Memory space and CPU usage.

Besides that, there is a possibility that something from the outside is interrupting the game. Somehow, even the antivirus software can’t detect that third-party interruption, and sometimes the Antivirus itself becomes the interruption. In that case, your best bet is to disable the Antivirus and see its effect.

Some methods might be difficult to carry out, but in other cases, it will be a piece of cake. However, to tackle this annoying issue, you can uninstall Modern Warfare 2 because there isn’t much of an effective fix to fix dev error 5479.

After that, try installing the game all over again. In doing so, a mere install will fix all the problems and errors related to the in-game experience by removing any corrupted components that might be causing this error.

That is all for our fixes for Modern Warfare 2 dev error 5479. If you are facing errors and issues with other PC games or your PC, then also see our hub for commonly occurring PC errors and their fixes.

Tip: Download DriverFix to scan and download all outdated drivers on your system. DriverFix makes fixing such Windows issues faster, easier, and simpler.

Categories
Tweaks and Fixes

Fix WaasMedic Agent.Exe High CPU Usage in 2 Minutes

WaaSMedic Agent.Exe, also known as waasmedic.exe or WaasMedicSvc helps install updates on Windows. It is an executable file that automatically initiates installation and completes pending updates. Microsoft uses some security updates to prevent malware or virus-related activities whenever an update is released on Windows.

How to Fix WaasMedic Agent.Exe High CPU Usage

CPU usage gets overloaded whenever an update is installed on windows, but suddenly, it is suspended. However, there can be a variety of possible reasons involved in this issue. Some common causes include a slow internet speed or connection. It causes problems with installing updates, and this unstable internet connection can stop the downloading process. Secondly, a corrupted file on your system running in the back can cause more problems. Even files installed after the main update can be corrupted.

Fix #1: Update Windows Manually

You should try updating Microsoft Windows manually. Updating Windows manually from a website with all updates available might work out for you. Since finding the source problem would be difficult, we updated it from the catalog. You can press Windows on your keyboard and type in ‘Services.’ Once you’re done opening the Windows service, click on Update services. You can see a button to stop on your left panel. After that, carry out this process repeatedly with medic service for Windows updates. After you’ve stopped all services, press open Run Program by clicking the Windows+R keys. Then, Type in C:\Windows\SoftwareDistribution as a directory in the search options box, and in the end, press Ok and delete all files here.

Go to the start menu and type Windows update. Open settings and search for View Update History. Look for missing updates and find them on Microsoft Catalog. Download and double-click to install the relevant update. Once done, check if the issue remains unresolved or not.

Advance Tip: You should use Restoro to scan for any registry, repository, or malware damage before trying these fixes. Restoro will repair and replace any damaged or corrupted files immediately.

Fix #2: Boot Window in Safe Mode

You should try running your system without the update services; you can reboot your PC in safe mode. Click on Windows+R, open Run, and type msconfig. Once you enter the given syntax, press Ok. Open the ‘Boot’ table and click on Safe Mode. Press Ok and Apply. All these steps will now reboot your PC in safe mode upon restarting.

Fix #3: Disable Directory for WaaSMedic Agent.Exe

Since WaaSMedic can not be easily disabled, Windows does not allow this action. However, you can disable WaaSMedic using the registry editor.

Press Windows to find the Registry Editor, and navigate to the following path in the editor:

“Computer\HKEY_LOCAL_MACHINE\SYSTEM\CurrentControlSet\Services\WaaSMedicSvc.” Then, from the right side, choose Start entry. After that, Change the value data to 3, and in the end, press Ok. Once the procedure completes, restart your computer to see whether the error appears again or not.

These fixes will surely help you with the issue of WaasMedic.exe causing a heavy load on your CPU. Make sure to follow each step to execute the troubleshooting method as discussed so that the fix successfully solves your problem.

Fix #4: Disconnect Removeable Drives

This isn’t a fix but a temporary workaround for this issue. WaasMedic Agent.Exe reportedly runs into issues due to removable storage. Remove external hard drives, USBs, and any other type of removable drives you might have connected to your system. Kill the process, and the problem should go away for the time being.

Fix #5: Clean Up Your Disk

Sometimes the issues are linked to low disk space in your drives. Use the C Drive cleaner and delete any Temp Files from your system. The built-in clean tool does the job but if the problem continues, use Restoro for a deeper cleanse of your PC. Restart the system, and hopefully, WaaSMedic Agent.Exe high disk usage problem is now fixed.

Have any more fixes for our readers? Leave them in the comments below.

Categories
Tweaks and Fixes

Fix Windows Explorer Using 80-100% GPU On Windows 11 in 2 Minutes

Something many Windows 11 users are complaining about is Windows Explorer using up to 80 to 100% GPU, as shown by the Task Manager. Whether Windows Explorer is being used or not, this problem persists. And even when they try to restart the program, the system crashes. This issue might be caused by several reasons – your graphics card might be too outdated, your Windows is outdated, your system is affected by malware, or some background applications are in use that negatively impacts GPU usage. If you are one of those experiencing this issue, do not worry because this guide provides many easy-to-follow fixes.

How to Fix Windows Explorer High GPU Usage

Tip: You should use Restoro to scan for any registry, repository, or malware damage before trying the following fixes. Restoro will repair and replace any damaged or corrupted files immediately.

Fix #1: Try Updating Windows

Something you might wanna try is, updating your windows to the latest version. Maybe you’ve kept your Windows Updates on hold for too long, or they are supposed to be updated manually. Either way, updating Windows is not difficult; all you have to do is follow these simple steps: Simultaneously press Windows+I, click on windows updates, and press the “Check for Updates” button at the right side of the screen. Wait for the system to check for all the updates; after that’s done, install them and wait, as this is a lengthy process. After all, updates are done, restart your PC and check to see if Windows Explorer still uses 80-100% GPU.

Fix #2: Update Graphics Drivers

You can even try updating your graphics drivers, as these issues might also be caused because your graphics drivers being too outdated. You can update your drivers by following these steps: First, you must turn on safe mode. Once it’s turned on, search for the device manager and click on it. Expand the Display adapter section and right-click on graphics drivers. Right-click on the targeted driver and update the driver. Let the system search for drivers automatically and later follow the on-screen instructions. Once everything is done, restart your computer and see if the issue has been solved.

Tip: Download DriverFix to scan and download all outdated drivers on your system. DriverFix makes fixing such Windows issues faster, easier, and simpler.

Fix #3: Use Clean Boot Process

If this problem started as soon as you installed a certain application, then there is a high chance that the app is causing the issue. To see if this is true, try using Clean Boot, which runs the PC only on necessary programs.

If you do not experience any GPU problems in clean boot mode, it’s confirmed that there is a problem with the third-party app you’ve installed. If updating the Graphics drivers or using clean boot didn’t do the trick for you, then let’s start with the last and final solution.

Fix #4: Uninstall And Reinstall Graphics Drivers

You can do the following steps to uninstall and reinstall the graphics drivers: Once again, turn on safe mode and locate the display driver uninstaller tool and install it. After it’s done, install, and extract the file, launch the 7-zip file and wait for it to extract. Launch uninstaller as administrator, choose the Graphics drivers, and click “clear and restart.”

Once the graphics drivers are uninstalled and the computer has been restarted, head over to the graphic cards manufacturer’s website and install the drivers according to your device. Wait for them to install, then restart your computer and see if the issue has been solved.

Categories
Tweaks and Fixes

Fix Adobe CEF Helper High CPU or Memory Usage on Windows

Many people report high CPU and Memory Usage issues due to Adobe CEF Helper. While this may seem like malware that has overtaken your computer’s processing power, it is just a background process that renders components by adobe creative cloud. Believing that Adobe CEF is the only reason behind High CPU usage is not entirely correct, as there could be many other reasons behind this problem.

How to Fix Adobe CEF Helper High CPU and Memory Usage

One of the reasons you’re facing this problem is likely due to corrupted system files. If this is the case, you’ll have to fix it for the current error’s sake and possible future errors. Other than that, it may very well be that your adobe creative cloud itself is corrupted. This narrows down the issue to the software, elevating other possibilities. If not, then third-party interference could be behind it all. Services like Antivirus and Firewall are usually in the backend, having control over the CPU usage since they have permission. In such a case, you’d have to disable them and see if the problem gets resolved.

Fix #1: Repair the Adobe Creative Cloud

First, you need to uninstall the service, and to do that, download the service uninstaller.

Once the Zip file downloads, locate it in the downloads section and extract it to “Creative_Cloud_Uninstallerwin\.” After that, find the unzipped folder location and launch the service uninstaller. While doing so, a pop-up will appear asking you to repair the service instead. So, click on it. Once done with the procedure, go ahead and check whether the CEF service still has high Memory usage.

Advance Tip: You should use Restoro to scan for any registry, repository, or malware damage before trying these fixes. Restoro will repair and replace any damaged or corrupted files immediately

Fix #2: Use PowerShell to Kill the Task

If you haven’t applied the above fix, then do so because this doesn’t work unless the service is repaired. Start off by launching the PowerShell via the Windows key. Once the PowerShell icon appears, run it as administrator by right-clicking it. Type in the following command and hit enter: “taskkill /t /f /im “Creative Cloud Helper.exe”. Once done, the service will shut off, and the problem should disappear.

Fix #3: Disable the Creative Cloud Service During Login

Start off by heading to the Settings app on windows. There, head over to Preference and then to the General section. You’ll see a toggle titled “Launch Creative Cloud at Login.” So click on it to disable it. Once that is done, head back, close all the apps, restart your PC and check if the CPU usage is back to normal.

Fix #4: Do a Clean Boot

When you doubt the third-party service behind the problem, do a clean boot, which starts your PC in a bare minimum state. Start off by opening the Run Program by clicking the Win + R keys. Then, type in ‘misconfig’ and hit Enter. Once you do that, a window will appear in front of you with two checkboxes to choose from. Select the ‘Selective Startup’ box.

After that, A new window will appear with a list of services. Here, remember to click on ‘Hide Microsoft services.’ Once done, just click on Disable all and exit by clicking on Ok. Once done with the procedure, restart your PC and see if the CPU usage has reduced.

Fix #5: Disable the Antivirus

Disabling Antivirus, a third-party software, allows you to eliminate background programs that take up CPU and Memory usage. To do this, get to your antivirus software’s icon via the taskbar at the bottom to the right of the screen. Once there, bring your mouse to the antivirus and wait for a list of options to appear. When they do, select the Disable for 10 minutes option and see if this makes any reduction in CPU usage or not.

Solving problems with Memory and CPU usage can be daunting as the computer itself lags and glitches when this happens. If the fixes above have worked for you, then congratulation. Otherwise, you can try reinstalling the Adobe Creative Cloud App as a final resort and see if that works out for you.

Drivers Giving You Trouble? Get DriverFix

If you’re having driver issues, we recommend DriverFix to scan and update all your outdated drivers in just one click. DriverFix solves your issues faster; it is easy to use and lets you know whenever a driver update is available. Download updates from popular brands, 100% malware and virus free.

Categories
Tweaks and Fixes

Fix “An Error Has Occurred Please Try Again Later” On YouTube in 2 Minutes

YouTube is one of the most utilized apps by users worldwide, and when these users face errors like “An Error has occurred please try again later” On YouTube, they find themselves frustrated, to say the least.

How to Fix “An Error has Occurred Please Try Again Later” On YouTube

It has been established that YouTube users may be facing this error which prevents them from watching any videos due to a number of reasons. To state a few main ones, your ISP (Internet service provider) may be causing inconsistencies with connection to YouTube, or your YouTube settings may have been altered, causing such errors. Usually, YouTube servers are very stable and unproblematic, but if you are experiencing this devious error, do not worry, as this guide will help you find your way around this. Follow our list of fixes described in the next section.

Fix#1 – Try Using A Different Browser

We highly recommend you try watching YouTube videos on a different browser than what you usually use. If the browser you use is outdated or has problems on its servers, then using another browser might solve the “An Error has occurred please try again later” error. We know it may seem bizarre to change your browser just because of YouTube. It’s not necessary to only use the other browser; you can use YouTube on the new browser and do all the other things you want on the previous one.

Fix#2 – Clear Your Browser Data

You can even try cleaning all your browser data, such as search history, website URL, and past activities, if the previous fix did not work. Even the passwords you use while using the browser are saved as data. Clearing browser data is not that difficult; you have to clear chrome’s cache data by clicking on the three dots in the top right corner. Click on “more tools” and “clear data.” Select the data you want to clear and click “clear browsing data.”

Fix#3 – Try Changing The Video Quality

Many users have reported that changing the video quality has fixed this issue. You can change the video quality of YouTube videos by clicking on the video that’s being played and clicking on the gear symbol, then select “Quality” and click on “Advance” and pick the video quality that is lower than the last.

Fix#4 – Allow Third Party Cookies

Sometimes “An Error has occurred. Please try again late” occurs on YouTube because third-party cookies might be disabled. If you do not know how to enable third-party cookies, follow these simple steps. Open Google Chrome and type “chrome://settings/content/cookies” in the search bar and see if “block third party cookies” are enabled; if they are, simply just disable them and check to see if you can play YouTube videos again.

We hope this guide has helped you fix the “An Error has occurred please try again later” On YouTube, and you can now finally watch YouTube videos in peace without any unnecessary interruptions.

YouTube Giving You Trouble?

Tip: Many YouTube issues can be resolved by simply using a VPN. One of the best in the world is NordVPN, and the good is that you can buy it right now at Black Friday discounts, up to 68% off.

Categories
Tweaks and Fixes Windows

Fix Windows 11 Update Error 0x8024A004 in 2 Minutes

Nowadays, there are a lot of complaints about Windows 11 Update processes being interrupted by error messages. The confusion and stigma around why these happen so often can make it hard for some to navigate through them. So, in this guide, we’ll analyze the Error code 0x8024A004, giving you several fixes that have worked for many.

What Is Causing Error 0x8024A004

The main issue regarding this error appears when users update from the 21H1 version of Windows 11 to the 22H2 version. Since the error message doesn’t reveal much about the source of this problem, users are bound to trust the fixes given on the internet. However, we’ve researched the problem thoroughly, collecting credible fixes from legitimate sources.

Fix #1 – Run the Troubleshooter

It feels like Microsoft Windows has been facing these issues since the dawn of time. Now they’ve developed built-in tools and services that help you deal with update-related issues. The first thing you should try is running the Troubleshooter on Windows 11.

Start by opening the Windows Settings from the Start Menu. Then, click on System and head over to the Troubleshoot section on the right side of the window. Click on ‘Other Troubleshooters’ option and locate the Windows Update Troubleshooter. After that, run it and wait for it to come up with the report. It will most likely provide you with a bunch of fixes to apply. Simply click on the Apply Fix option and advance. Once the fixes have been applied, go ahead and restart your PC and see if the problem still prevails or not.

Troubleshooter
Other Troubleshooters
Windows Update Troubleshooter

Fix #2 – Try Out Basic Fixes

First, disable any antivirus software running in the background (if you’re using any). After that, remove any other peripheral devices connected to your System besides the keyboard and mouse. This will eliminate any chances of the System’s update getting interrupted by a miscellaneous process. Devices such as headphones, speakers, external drives, external DVD Roms, etc., must be removed. Once you do the above, try reinstalling the update and see if any errors pop up. We’ve got a final trick for this problem if they still do.

Fix #3 – Install Updates via ISO Files

You can only try to do this manually instead of asking Windows.

Locate the Download Windows 11 Disk Image (ISO) section on the official website. There you’ll see a list of Windows versions. Click on Windows 11 and proceed by pressing the download button. After that, select the installation language and hit the download button again after confirming your choice. After it downloads, head to the file and right-click to mount it.

Then, select a suitable drive for it to mount to and launch the setup file. Once done, a series of prompts will appear. Advance by clicking on Next and Accept till you reach the Install option. After the process, you’ll be done with your update, and hopefully, the new 22H2 version will work fine for you.

Tip: If you’re having trouble with Windows updates, registry errors, drivers, and activation, we recommend using Restoro. This software will scan and fix your problem automatically. Download and run Restoro and never worry about Windows Update problems.

Solving Update issues can be daunting if simple solutions don’t work out. However, in most cases, the problem isn’t that complicated and requires only a few adjustments. Error Code 0x8024A004 is no exception, and trying out the dedicated Troubleshooters by windows or manually installing the update can solve the problem easily.

Fix #4 – Clear Windows Update Services and Cache

Again, we recommend using Restoro for this, as it makes the process simpler, faster, and easier. But if you would rather do it manually, open the command prompt by typing Command Prompt in the Search menu. Run the command prompt as administrator, type “net stop wuauserv,” and hit Enter. Now type “C:” and hit enter; now type “cd %Windir%\SoftwareDistribution” and hit enter again. Lastly, type del /f /s /q Download and hit enter.

That’s everything we have for now but if you know of any other fixes for our readers, let us know in the comments below.